Let me start with, I love going to yard sales. You just never know what treasures you will find...or what junk you think you just can't live without! LOL And when that junk turns into something really cool--well that makes it all the more fun!
What am I rambling about???? Wood thread spools!!!!!
As best I can figure, they stopped putting thread on wood spools in the mid 70s. Then came the plastic and (oh the horror) styrofoam spools.
Last weekend I came across a shopping bag full of wood spools. Most still had their labels intact...which is great if you want to try and date them. It turns out most of them are from the 40s and 50s. Cool huh?!
I looked at that bag and then walked away. Geez, what on earth would I do with approximately 70-80 spools? But, as we turned to head back to the car, I just couldn't leave them. I grabbed that bag and handed over my dollar and waltzed to my car with the this thought running through my head....Good lord, where am I going to store these? And how the heck am I going to use them?
I sent my questions to Pam....she always has great answers! She bombarded me with tons of info on carving spools! Thanks Pam!!!!!
So, that is how I spent my week....carving spools! LOL Ok, I have never carved anything in my life. And patience is not one of my virtues. If a project takes me more than a couple hours then I don't want to do it! LOL So, I am not like all those others you will find online that hand carve every little detail and fine tune every line so that it is a great work of art you want to hang it on your wall and treasure forever. I am a "hand me my Dremel and lets see what happens" kinda girl.
Thankfully I like the rustic, primitive look. Hopefully you do too. :-)
Here is my very first carving. This spool is 1 1/2" tall and about a 1 1/8" wide carving area. Now, understand, when I did this one I had no 'carving' bits for my Dremel. I was totally winging it. LOL So, he is a bit rougher than the others. (I headed out to the hardware store the next day and bought several of the appropriate bits). Amazing how much difference the proper tools make LOL
 Here is Santa #2. As you can see, a bit on the smoother side. LOL This spool (and all the others here) is only 1 1/8" tall and a 7/8" wide carving area.
 Here he is, now complete with jute hanger, rusty jingle bell and a button.
I paint them with acrylic paints then seal them with an acrylic paint-on sealer. I let that cure and then antique them with antiquing gel and once dry, another coat of the acrylic sealer.
I love how the antiquing medium brings out all my carving lines (even my flubs LOL) but also the grain in the wood.
 Sticking with the Christmas/Winter theme, here is a snowman in a stocking cap....because I thought the ribs in his hat would look cool. :-)
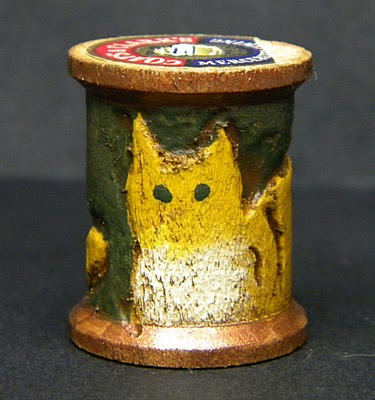
 And then I got the idea of a striped cat...but I used the carved lines to form the stripes. His body wraps around the spool...that little yellow tip on the left side is the tip of his tail. I think he is pretty cute.
 And my last complete one is this Jack O Lantern. I wanted to use the grooves to create the lines on the pumpkin. I also experimented with carving out his eyes and some stars on the back. This pic shows him before and after antiquing. I am thinking of maybe next time doing a pumpkin (not jack o lantern) with the vine and a leaf attached.
 Currently I have 6 spools sitting here drawn up waiting to be carved....a Santa, an angel, a witch, a Halloween cat, a bird and a wreath of holly. I have found that I can only do 1 or 2 in a carving session because the Dremel makes my hands all tingly/vibraty for a couple hours afterwards if I do any more than that LOL
Ok, off to make breakfast and out to the garage for some carving! Happy Summer everyone!
