Since I created a journal to swap with Pam and one for the bad baby swap and then another one for the bad baby swap because the first one got lost in the mail, I had to come up with a lot of ideas on how I wanted my journal wrecked.
The swap with Pam is more artistic things, the one for bad babies is more destructive.
I thought I would share my ideas in case anyone else is looking for ways to "wreck" a journal. Be warned, this list contains over 140 ideas. Some are very specific others are vague, leaving interpretation up to the wrecker. Each direction pertains to the page it is written on.
Splatter the cover with paint
Doodle all over this page
Step in mud then this page
Leave open on this page outside overnight
Burn part of this page
Poke holes in page
Drive over page
Color then take this page in the shower with you
Rub in the grass
Spill your drink on this page
Color vertical lines
Tear out-crumple-dry brush-reattach
Draw a hotdog –slather with mustard
Let your pet play with this page
Color then put under the sprinkler
Jump up and down on this page
Stick this page in a fan
Cut into strips
Throw rocks at it
Use as a napkin
Cover with circles
Dribble glue all over
Fold this page into an origami shape
Freeform - tear out squares
Repeatedly write one word over and over
Cover with hand prints
Cover with foot prints
Drag the book down the driveway
Cover with food labels
Cover with junk mail
Sew stitches all over
Let potato chips sit on this page over night
Create a loud sound via color
Glue leaves/petals
Kiss this page
Rub garlic all over
Do a rubbing of something
Tear out and sit on this page all day
Wad up and soak in a cup of tea, let dry then reattach
Let a child color
Scorch with an iron
Splatter with candle wax
Use as a coaster
Tear into pieces then tape back together
Paint page all one color
Scribble viciously
Cover with toothbrush splatters
Pound with a hammer
Cover with masking tape
Candle smoke
Chalk it up
Folds and staples
All the colors in the box
Drill through the back cover
Draw a picture of your house, eyes closed
Cut out a photo of a pretty model – ugly her up
Document all the food you ate today
Fill entire page with lots of colors
What do you see on the drive to work
Smear ink or paint all over the page
Happy thoughts
Fold page, tuck in pocket, wash pants then reattach
Glue newspaper page – circle all the words starting with T
Do what ever you want here
Let a spouse or friend alter this page
Stamp your favorite rubber stamp
Glue pic of self, alter it
Do something unpredictable on this page
Spray with your favorite scent
Sand this page
Use this page to wipe up a spill
Today’s to do list
Write you name over and over
Drip paint
Take a picture of you wrecking this book and add here
Draw a self portrait of how you feel today
Make a leaf or veggie print
Shaving cream technique
Write out the plot of the last movie you saw
Cover with stamps from the mail
Finger paint with anything you want
Draw with your non-dominant hand
Decorate with stickers
Trace items from your purse or pocket
Trace your hand then decorate it
Color outside the lines (have a shape drawn on page)
Take a walk, glue found objects to page
Write the lyrics to your favorite song
Add phone book page – circle names you like
Add phone book page – collage it
Make a collage using only junk mail
Write you motto here
Dress this person (have a stick figure drawn on page)
This page has an boo-boo – fix it (have hole torn in page)
Fibers
Cut into strips – basket weave
Turn this letter into a animal (have large letter written on page)
Press flowers here
Cut out page – make a mini book
Something old, something new, something borrowed, something blue
Date – time – day of week – weather
Your grocery list
Close the book – write on the edges
Oh No! a ketchup stain!
Paint or draw with something other than a brush/pen/pencil
Beat the journal with a chain
Cover with egg shells
Add red things to this page
Cut out a jack o lantern face
What was you favorite page?
Draw the view from your window
Create your own ink blot
Use oil pastels – draw flowers
Create a collage portrait using only scraps
Make a red ATC
Create ‘stained glass’
Paint randomly with eyes closed
Picasso
Seurat
Warhol
Create using food labels
Buttons
Draw what you did today
Create a picture of your dinner –medium up to you
Collage “love”
A favorite childhood memory
It’s not easy being green
My art wish list
Pollack
Favorite holiday
3D
doodle while on the phone
letters and postcards
favorite season
create a row house
attach a newspaper page, color on top of it
homage to cats
incorporate letters
what did you dream last night?
Collage in blues from magazine pics
Scrapbook your day
My favorite flower in the yard
Fill in these squares (draw or stamp squares on the page)
Create with candy wrappers
Pen and ink a tree
Use torn scraps – no cutting - collage
Saturday, June 13, 2009

Friday, June 12, 2009
Wreck that Journal!
Maybe I should say "ART" that journal!
I have been hard at work on Pam's journal and I really need to get it done soon as I now have the other journal from the bad baby swap here too!
Below I have added a few of the many works I have finished in Pam's journal. In case I never mentioned this before....there are 100 pages in the journal. (I have about 15 left)
The instructions were:
Color this page then spritz with bleach.
I painted this sunny fellow (and didn't think to take his picture before I wrecked him) using Twinkling H2Os because they are a water color and thought they would have a nice effect with the bleach.
 Here is a close up. You can see the speckles where the color is now gone. It is not a huge bleached look but I really like how it turned out.
 Here I had to use a page from the phone book in a collage. This page listed all the local schools.
 The instructions just said "Hugs and Kisses". Well, I really had to struggle but I managed to eat enough Hershey Kisses to make a spiffy skirt for this lady. Yeah, I suffered! LOL (this is just a close up of part of the page)
 Ok, on this one I didn't really follow the directions. It said to "radically alter this page". I cut it out of the book and flipped it over so the writing was on the back then collaged the front and taped it back in. Not very radical but I had fun.
 I have to admit that I am having so much fun working on this journal and really like most of what I have done...to the point that it is going to be very hard to part with it. But then again I can't wait to see what Pam has done for me! :-D
I have been hard at work on Pam's journal and I really need to get it done soon as I now have the other journal from the bad baby swap here too!
Below I have added a few of the many works I have finished in Pam's journal. In case I never mentioned this before....there are 100 pages in the journal. (I have about 15 left)
The instructions were:
Color this page then spritz with bleach.
I painted this sunny fellow (and didn't think to take his picture before I wrecked him) using Twinkling H2Os because they are a water color and thought they would have a nice effect with the bleach.
 Here is a close up. You can see the speckles where the color is now gone. It is not a huge bleached look but I really like how it turned out.
 Here I had to use a page from the phone book in a collage. This page listed all the local schools.
 The instructions just said "Hugs and Kisses". Well, I really had to struggle but I managed to eat enough Hershey Kisses to make a spiffy skirt for this lady. Yeah, I suffered! LOL (this is just a close up of part of the page)
 Ok, on this one I didn't really follow the directions. It said to "radically alter this page". I cut it out of the book and flipped it over so the writing was on the back then collaged the front and taped it back in. Not very radical but I had fun.
 I have to admit that I am having so much fun working on this journal and really like most of what I have done...to the point that it is going to be very hard to part with it. But then again I can't wait to see what Pam has done for me! :-D
Thursday, May 28, 2009
My Ballerina Pig
So, here she is. I think she is adorable but the people at work didn't like it at all. They opted for plain colored/air brushed pigs.
Oh well, no accounting for taste I guess. I knew going into this that it was not an 'art' contest so no surprise that I didn't even come in in the top 5.
She is wearing a tutu, ballet slippers and her upper dress is covered with paintings of ballerinas.
 How can you pass up a face like this?

Oh well, no accounting for taste I guess. I knew going into this that it was not an 'art' contest so no surprise that I didn't even come in in the top 5.
She is wearing a tutu, ballet slippers and her upper dress is covered with paintings of ballerinas.
 How can you pass up a face like this?
Thursday, May 14, 2009
Journal Wrecking is FUN!
I have been doing some serious wrecking over the past week! My friend Pam, from Maine, and I created our own journals for wrecking using standard composition books which means 100 pages worth of instructions---100 pages to 'wreck'! We decided to stick with more "artistic" themes and fewer "destruction" ideas.
First: Concentric Circles! This one took me forever LOL My hand was so tired from coloring round and round. I pulled out several different brands of pencils to get all these wonderful colors!
 Anybody remember the Psychedelic posters of the 60s? Well, I vaguely remembered so I had to do a search online LOL
 Now, I have more going on this week than just wrecking pages! I entered a contest at work. I have to decorate this piggie bank. You can't really tell from the picture but it is clear, blue plastic and stands around 5 inches tall.
I will post the process and finished product after the contest ends (the end of May) Wouldn't want to give away my secrets. :-)
 And finally. Minnie has made herself right at home! Today she decided that hubby was more comfortable than the sofa. He even moved her butt back up onto the sofa and she slid it back down onto his shoulder LOL

First: Concentric Circles! This one took me forever LOL My hand was so tired from coloring round and round. I pulled out several different brands of pencils to get all these wonderful colors!
 Anybody remember the Psychedelic posters of the 60s? Well, I vaguely remembered so I had to do a search online LOL
 Now, I have more going on this week than just wrecking pages! I entered a contest at work. I have to decorate this piggie bank. You can't really tell from the picture but it is clear, blue plastic and stands around 5 inches tall.
 I will post the process and finished product after the contest ends (the end of May) Wouldn't want to give away my secrets. :-)
 And finally. Minnie has made herself right at home! Today she decided that hubby was more comfortable than the sofa. He even moved her butt back up onto the sofa and she slid it back down onto his shoulder LOL
Sunday, May 03, 2009
Wrecking My Journal
I spent the weekend wrecking and creating journals. I finished up the journal for the badbaby swap and it is now ready for mailing whenever our swap partners are assigned AND I am now going to do a one on one swap with another BadBaby friend - Pam - and I wrote up a journal for her (but we are doing more art and less wrecking which should still be loads of fun!)
As for my "wrecking", I have flipped through the book several times and some of the things are going to be hard for me to do....for various reasons LOL
I decided to get one of hard ones out of the way fast. Now, after I did it I was thinking gee, 'dirty' could have been as simple as using ink or paint, something I do every day but that isn't what came to mind once I decided to 'just do it'! It had been raining off and on last Friday and during a break, I ran out to the garden, pressed my hand into the mud and slapped it onto the page...then really smooshed it on there for good measure. When I looked at my hand, it was still caked with mud so I slammed it back down onto the facing page as well....It felt GOOD!!!! LOL My mom would have killed me if I had done this to a book as a kid! LOL
 After washing my hands (cause mud in the journal is fine but all over my white recliner is NOT) I sat down and did this page of circles. I had bubbles on the brain. LOL
 Yesterday I scratched my page...still raining which may have contributed to the subject matter...not really sure as I really didn't put much forethought into it, just picked up my exacto knife and started scratching.
 Today I tackled poking holes in the page with a pencil. I worked from the back so as to not be distracted from the "holes" printed on the page. Took me forever as I was being a neat freak about it LOL

As for my "wrecking", I have flipped through the book several times and some of the things are going to be hard for me to do....for various reasons LOL
I decided to get one of hard ones out of the way fast. Now, after I did it I was thinking gee, 'dirty' could have been as simple as using ink or paint, something I do every day but that isn't what came to mind once I decided to 'just do it'! It had been raining off and on last Friday and during a break, I ran out to the garden, pressed my hand into the mud and slapped it onto the page...then really smooshed it on there for good measure. When I looked at my hand, it was still caked with mud so I slammed it back down onto the facing page as well....It felt GOOD!!!! LOL My mom would have killed me if I had done this to a book as a kid! LOL
 After washing my hands (cause mud in the journal is fine but all over my white recliner is NOT) I sat down and did this page of circles. I had bubbles on the brain. LOL
 Yesterday I scratched my page...still raining which may have contributed to the subject matter...not really sure as I really didn't put much forethought into it, just picked up my exacto knife and started scratching.
 Today I tackled poking holes in the page with a pencil. I worked from the back so as to not be distracted from the "holes" printed on the page. Took me forever as I was being a neat freak about it LOL
And finally, right before I began this blog, I opened up the back door and threw my journal (quite hard) against the nearest tree. Following the directions: Make a Sudden, Destructive, Unpredictable Movement with the Journal. It bent up the back cover and did some serious scuffing on one of the pages inside...nothing horrendous though so I may do some more unpredictable stuff in the future. :-)
That about covers my weekend...no "real" art was created LOL
Thursday, April 30, 2009
Wreck This Journal
The badbaby art group is going to do a "wreck this journal' swap. I have never done one of these and with all the stress in my life, I thought it would be great fun!
We will 'wreck' someone elses journal and then send it back but I thought I would like to have one to keep as well so I bought a copy of Keri Smith's book that started this craze.
This way I can play and get to keep it and remind myself of how I felt at the time and savor the memories LOL
 Here is my journal, pristine and just home from the store! I haven't even cracked the spine yet (which is one of the instructions LOL)
For our swap journals, we need to buy a composition journal with at least 100 pages. I found one in a really obnoxious green that anyone would LOVE to wreck! HaHa We then put our own instructions on each page. I had no problems coming up with the first 40 or so. It took some deep thought for the next 40 and now I am struggling for the last 20. No problem though, I have until...um....late May? early June? I better go and find out!
I will keep you posted when I do some interesting wrecking on either this journal or the swap one. :-)
My other news is that although I miss my baby Tucker and will never ever forget him, I got a new cat this week.
She is completely different in both looks and personality!
Her name is Mignonette (min-yawn-et), Minnie for short. It means 'delicate'. She is very dainty! She is also very outgoing and loves EVERYONE! She picked me out at the Animal Shelter and they estimate that she is a year old.
She and Kitty (hubby's cat) are still working out the boundaries but seem to be getting closer every day.
Isn't she a cutie?
 She now sports a silver, shimmery collar because she is such a princess!
We will 'wreck' someone elses journal and then send it back but I thought I would like to have one to keep as well so I bought a copy of Keri Smith's book that started this craze.
This way I can play and get to keep it and remind myself of how I felt at the time and savor the memories LOL
 Here is my journal, pristine and just home from the store! I haven't even cracked the spine yet (which is one of the instructions LOL)
For our swap journals, we need to buy a composition journal with at least 100 pages. I found one in a really obnoxious green that anyone would LOVE to wreck! HaHa We then put our own instructions on each page. I had no problems coming up with the first 40 or so. It took some deep thought for the next 40 and now I am struggling for the last 20. No problem though, I have until...um....late May? early June? I better go and find out!
I will keep you posted when I do some interesting wrecking on either this journal or the swap one. :-)
My other news is that although I miss my baby Tucker and will never ever forget him, I got a new cat this week.
She is completely different in both looks and personality!
Her name is Mignonette (min-yawn-et), Minnie for short. It means 'delicate'. She is very dainty! She is also very outgoing and loves EVERYONE! She picked me out at the Animal Shelter and they estimate that she is a year old.
She and Kitty (hubby's cat) are still working out the boundaries but seem to be getting closer every day.
Isn't she a cutie?
 She now sports a silver, shimmery collar because she is such a princess!
Sunday, April 26, 2009
A new True Colors journal
This weekend I finally got around to working on Teresa's journal. I have had it for about a month now and just kept putting it off. The problem was, her color scheme was WAY outside my comfort zone. She chose colors I rarely use and NEVER use them together! (well I do use Red a lot but never with Bright Green and Orange!)
You have no idea how much I worried over this one! I flipped through the book looking at all the other artwork and don't get me wrong, it is wonderful....but it was just not my style.
Oh what to do?!
My brain just kept coming back to the strolling couple. (no clue who makes this stamp) I finally decided they needed to be strolling in a strange landscape. I really began longing for the UFO I carved years ago but the ex took that in the divorce....don't get me started on that issue! I painted their clothing with Twinkling H2os so they would shimmer.
So, the search began....not an unpleasant thing when you own over 3000 stamps.
I pulled out my new bare trees from Inkadinkado and turned them into brightly painted bushes. I stamped them on orange cardstock and then drew in the path with colored pencils.
The hills are a Fred B Mullett stamp (Menpachi to be exact). What, doesn't everyone use a fish to create hills?
I cut a stencil and used water-based oil pastel crayons to add some faint clouds.
The moon is from Tin Can Mail, she is colored with pencils as well.
The couple dancing on the clouds is from Emerald City Stamps. Their clothes are also painted with the Twinkling H2os.
I sat back and looked at the world I had created and have to say I really like it LOL But, I felt it needed something more. Alas, the chicken decided she needed to make an appearance...I just love her expression. (she hails from Art Gone Wild). I drew her sign and then stamped in the words 'wish you were here'.
Believe me when I say, this piece is much brighter in person LOL
Oh and don't you love that funky sky? I have had that sheet of paper for over 10 years. No idea what possessed me to buy it in the first place but it sure fit in great with this piece!
 So, Teresa's book was set up so that you removed a page and arted up the front and the back...instead of the typical open book spread where both pages create one piece of artwork.
This was both a challenge and a relief. I didn't have to have one huge landscape, I could go in 2 completely different directions.
As I was browsing for stamps for page 1, I began pulling ideas for page 2...just in case something came to mind.
I grabbed the woman and the hands both of which I had just picked up on my last visit to the coast.
As I stared at the woman...hey, if you are going to be that size and stand like that you deserve to be stared at! I really wanted to put her in a mason jar...don't ask me why. But, the only jar I could find wasn't big enough. I have a bigger one but can't find it! I really need to reorganize my stamps (again!) But I did remember where my snowglobe was and she was a perfect fit!
So, I had the beginnings of an idea but how to proceed. I began the search for background paper and the first stack I picked up was the Once Upon A Time mat stack...what the heck...I found the mermaid paper and loved how her posture echoed that of my exercising? woman and the sparklies were all bright shimmery green!
I stamped my woman (VivaLasVegastamps) and painted her outfit with Twinkling H2os (of course! LOL). Next came the snowglobe (Rubber Stamps Inc). I stamped the globe on transparency film and the base on cardstock.
The sand is one of my first stamps and is over 20 years old...some stamps never go out of style! In all these years I have never needed to know who made that stamp so I never peeled off the price sticker (I paid $5.50 btw) until now because of course, the company name was under the sticker....it was from a company called Raindrops on Roses. Hmm, never heard of them LOL Anyway, the sand was stamped 3 times and layered around the woman's foot.
The hands come from Stamper's Anonymous. They come very close together on the stamp, I cut them apart after stamping and moved them farther apart to support the snowglobe.
I played with the idea of adding text but decided against it.
 I know this second piece doesn't have any red or orange but my muse has been silent for such a long time that I figured if this was what she wanted to do then who was I to argue?! Besides, it made me smile and I think that is what was important for this piece. :-)
You have no idea how much I worried over this one! I flipped through the book looking at all the other artwork and don't get me wrong, it is wonderful....but it was just not my style.
Oh what to do?!
My brain just kept coming back to the strolling couple. (no clue who makes this stamp) I finally decided they needed to be strolling in a strange landscape. I really began longing for the UFO I carved years ago but the ex took that in the divorce....don't get me started on that issue! I painted their clothing with Twinkling H2os so they would shimmer.
So, the search began....not an unpleasant thing when you own over 3000 stamps.
I pulled out my new bare trees from Inkadinkado and turned them into brightly painted bushes. I stamped them on orange cardstock and then drew in the path with colored pencils.
The hills are a Fred B Mullett stamp (Menpachi to be exact). What, doesn't everyone use a fish to create hills?
I cut a stencil and used water-based oil pastel crayons to add some faint clouds.
The moon is from Tin Can Mail, she is colored with pencils as well.
The couple dancing on the clouds is from Emerald City Stamps. Their clothes are also painted with the Twinkling H2os.
I sat back and looked at the world I had created and have to say I really like it LOL But, I felt it needed something more. Alas, the chicken decided she needed to make an appearance...I just love her expression. (she hails from Art Gone Wild). I drew her sign and then stamped in the words 'wish you were here'.
Believe me when I say, this piece is much brighter in person LOL
Oh and don't you love that funky sky? I have had that sheet of paper for over 10 years. No idea what possessed me to buy it in the first place but it sure fit in great with this piece!
 So, Teresa's book was set up so that you removed a page and arted up the front and the back...instead of the typical open book spread where both pages create one piece of artwork.
This was both a challenge and a relief. I didn't have to have one huge landscape, I could go in 2 completely different directions.
As I was browsing for stamps for page 1, I began pulling ideas for page 2...just in case something came to mind.
I grabbed the woman and the hands both of which I had just picked up on my last visit to the coast.
As I stared at the woman...hey, if you are going to be that size and stand like that you deserve to be stared at! I really wanted to put her in a mason jar...don't ask me why. But, the only jar I could find wasn't big enough. I have a bigger one but can't find it! I really need to reorganize my stamps (again!) But I did remember where my snowglobe was and she was a perfect fit!
So, I had the beginnings of an idea but how to proceed. I began the search for background paper and the first stack I picked up was the Once Upon A Time mat stack...what the heck...I found the mermaid paper and loved how her posture echoed that of my exercising? woman and the sparklies were all bright shimmery green!
I stamped my woman (VivaLasVegastamps) and painted her outfit with Twinkling H2os (of course! LOL). Next came the snowglobe (Rubber Stamps Inc). I stamped the globe on transparency film and the base on cardstock.
The sand is one of my first stamps and is over 20 years old...some stamps never go out of style! In all these years I have never needed to know who made that stamp so I never peeled off the price sticker (I paid $5.50 btw) until now because of course, the company name was under the sticker....it was from a company called Raindrops on Roses. Hmm, never heard of them LOL Anyway, the sand was stamped 3 times and layered around the woman's foot.
The hands come from Stamper's Anonymous. They come very close together on the stamp, I cut them apart after stamping and moved them farther apart to support the snowglobe.
I played with the idea of adding text but decided against it.
 I know this second piece doesn't have any red or orange but my muse has been silent for such a long time that I figured if this was what she wanted to do then who was I to argue?! Besides, it made me smile and I think that is what was important for this piece. :-)
Saturday, April 11, 2009
My Float Came Home
My float arrived in the mail today! I was so excited I was giggling all the way back across the street, clutching the box tightly to my chest!
When you go to make your float they ask you what color you want....any color. No one told me I could only pick one color so I said, "blue and green". Daniel says, "ok, but we have 2 colors of blue....turquoise and cobalt". I told him I wanted both! He said that was no problem. Now all the people ahead of me picked just one color....guess I just like to be different. LOL If you watch the video you will see him laying out the piles of color.
What I found out a few minutes later was that when you pick a color they dump out a pile of colored chips. It is a mix of colors so in the green box was a really dark, clear emerald, a milky grass green, a light yellow-green and at least 1 or 2 more shades. so, by choosing 3 colors I was in reality choosing about 12-15 colors. Who knew?! LOL

 Below is a view of the studio's mark stamped into the plug.

When you go to make your float they ask you what color you want....any color. No one told me I could only pick one color so I said, "blue and green". Daniel says, "ok, but we have 2 colors of blue....turquoise and cobalt". I told him I wanted both! He said that was no problem. Now all the people ahead of me picked just one color....guess I just like to be different. LOL If you watch the video you will see him laying out the piles of color.
What I found out a few minutes later was that when you pick a color they dump out a pile of colored chips. It is a mix of colors so in the green box was a really dark, clear emerald, a milky grass green, a light yellow-green and at least 1 or 2 more shades. so, by choosing 3 colors I was in reality choosing about 12-15 colors. Who knew?! LOL

 Below is a view of the studio's mark stamped into the plug.
Wednesday, April 08, 2009
Blowing my own Glass Float!
We just got back from a mini anniversary vacation over to the Oregon Coast.
While over there, I made hubby drive me up to Lincoln City to try my hand at glass blowing. (something I have never done before)
The Jennifer Sears Glass Studio offers you the opportunity to blow a float or paper weight with the help of one on one instruction.
My instructor, Daniel, was very patient and kept telling me repeatedly what a great job I was doing. I don't know if this was true or not but it sure made me feel like I was not a total doofus! LOL
I highly recommend, if you are ever in the vicinity of Lincoln City, to check it out. I had a blast!
Below is the video of my experience from start to finish. I will warn you, it is almost 15 minutes long AND because I had to reduce the file size so much to be able to show it online, the sound it a bit weird.....but if you have the patience and make it to the end, you will get to see my finished float. :-)
I don't currently have my float....as it turns out, when the float is finished, it is still something like 1200 degrees so they put them in a kiln and lower the temperature slowly so they don't crack or shatter. You could pick it up the following day or have it shipped. As we were going to be driving all the way down the coast, I opted to have it shipped. I should have it by either Saturday or next Monday. I will post a photo when it arrives.
Saturday, March 28, 2009
True Colors swap - again
It has been quite a while since I had one of the books from the True Colors swap that I am in (before Christmas I think)
I just finished working on Nancy's "Neutrals with subtle pinks, blues and greens"
I browsed through my paper stash and found this "postcard" paper in my Photo Stack pack. I thought it fit the 'neutral' theme well and I love using writing as background.
I then began thinking about what would go with all those correspondences. What if someone was having a long-distance relationship?
So, I then began the search through my clip art cds for the perfect woman. I think she portrays a feeling of longing and hope.
The text is from Mahatma Ghandi: Prayer is not asking. It is a longing of the soul. It is daily admission of one's weakness. It is better in prayer to have a heart without words than words without a heart.”
The butterflies were created in Photoshop Elements. They are from a set of butterfly brushes you can download for free here
I first created them in color then did a final layer in black to define the lines. I printed them onto transparency film and attached them to the pages by just their body using Crystal Lacquer.
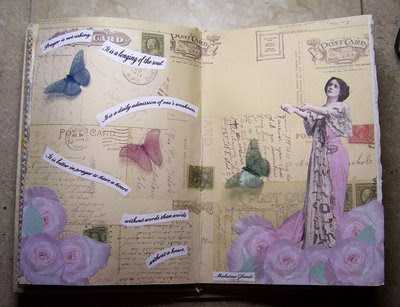
I just finished working on Nancy's "Neutrals with subtle pinks, blues and greens"
I browsed through my paper stash and found this "postcard" paper in my Photo Stack pack. I thought it fit the 'neutral' theme well and I love using writing as background.
I then began thinking about what would go with all those correspondences. What if someone was having a long-distance relationship?
So, I then began the search through my clip art cds for the perfect woman. I think she portrays a feeling of longing and hope.
The text is from Mahatma Ghandi: Prayer is not asking. It is a longing of the soul. It is daily admission of one's weakness. It is better in prayer to have a heart without words than words without a heart.”
The butterflies were created in Photoshop Elements. They are from a set of butterfly brushes you can download for free here
I first created them in color then did a final layer in black to define the lines. I printed them onto transparency film and attached them to the pages by just their body using Crystal Lacquer.

Sunday, March 15, 2009
Queen For A Day!
The latest Bad Baby swap? A mini book. The theme? Queen For A Day. Oh Boy! Wouldn't I LOVE to be a queen for a day!!!!!!!
First, to make the book, go Here
I used a page from my Far East mat stack. It was a bit thick but with a lot of heavy use of the bone folder, I think it will be ok. I cut the 12x12 page down to 9x12. I wanted a bit more space to art up then a 8 1/2x11 page gave me.
This is my cover. All the women in my book are from StoneHouseStamps. This woman is colored completely with colored pencils.
 Pages 1 and 2. The dresses on both of these women were colored with watercolor pencils. On everything else I used regular colored pencils.
 Pages 3 and 4. Everything but their skin is watercolored.
 Pages 5 and 6, again, everything but her skin is watercolored. The bamboo and dragonfly are both from VivaLasVegaStamps.
 I thought this was such a fun project. I was able to complete the entire thing in just a few hours. Now I have to send it off and will received someone else's ideas of what it means to be Queen for the Day.
First, to make the book, go Here
I used a page from my Far East mat stack. It was a bit thick but with a lot of heavy use of the bone folder, I think it will be ok. I cut the 12x12 page down to 9x12. I wanted a bit more space to art up then a 8 1/2x11 page gave me.
This is my cover. All the women in my book are from StoneHouseStamps. This woman is colored completely with colored pencils.
 Pages 1 and 2. The dresses on both of these women were colored with watercolor pencils. On everything else I used regular colored pencils.
 Pages 3 and 4. Everything but their skin is watercolored.
 Pages 5 and 6, again, everything but her skin is watercolored. The bamboo and dragonfly are both from VivaLasVegaStamps.
 I thought this was such a fun project. I was able to complete the entire thing in just a few hours. Now I have to send it off and will received someone else's ideas of what it means to be Queen for the Day.
Saturday, March 14, 2009
April Showers
I am still trying to get caught up on my sleep after 'springing forward' last weekend and can hardly keep my eyes open but I just had the urge to stamp....so I did!
A few weeks back (a couple days after Tucker died) I bought a stamp of a silhouette of a line of bare trees. It just had a cold, empty feeling to it....kind of like how I was feeling....and I thought it would be great for a winter scene (which I am sure it will). But this evening, I looked at it and it demanded to be a row of Cherry Blossoms. (I'll bet it is going to be great in the fall too!)
I stamped my trees (Inkadinkado) in black in on a scrap of one of my Far East background papers. I then stippled on rose acrylics followed by pink and finally a tiny bit of white. I like how the texture of the paper shows on the trunks, I think it makes them have a softer feel, not so stark.
I used more of that Chinese newspaper, torn into pieces, for my ground. I brushed the edges with various shades of green water color pencil.
I stamped the girl (StoneHouseStamps) onto plain white cardstock (actually I use unruled index cards for these types of things--no visible texture, nice and white and a good weight).
I colored her using regular and water color pencils.
She was attached to the card using foam tape so she would stand out.

A few weeks back (a couple days after Tucker died) I bought a stamp of a silhouette of a line of bare trees. It just had a cold, empty feeling to it....kind of like how I was feeling....and I thought it would be great for a winter scene (which I am sure it will). But this evening, I looked at it and it demanded to be a row of Cherry Blossoms. (I'll bet it is going to be great in the fall too!)
I stamped my trees (Inkadinkado) in black in on a scrap of one of my Far East background papers. I then stippled on rose acrylics followed by pink and finally a tiny bit of white. I like how the texture of the paper shows on the trunks, I think it makes them have a softer feel, not so stark.
I used more of that Chinese newspaper, torn into pieces, for my ground. I brushed the edges with various shades of green water color pencil.
I stamped the girl (StoneHouseStamps) onto plain white cardstock (actually I use unruled index cards for these types of things--no visible texture, nice and white and a good weight).
I colored her using regular and water color pencils.
She was attached to the card using foam tape so she would stand out.

Friday, March 13, 2009
Retirement Card
A friend at work is retiring in a couple weeks (lucky girl!) so I made her a card.
This is the digital collage I put on the front of the card.
The "postage" frame is part of the Photoshop Elements 5.0 goodies. :-)
I found the champagne bottle in a Dover clipart book, scanned it, then did a light 'wash' over it to give it a tint.
The banner at the top is part of the Scrapbooking items already in Elements, I just added the text and although it is hard to see here, did a little shading where the ribbon bends to give it depth. Plus I added a drop shadow.
Happy Retirement Marsha!!!!!

This is the digital collage I put on the front of the card.
The "postage" frame is part of the Photoshop Elements 5.0 goodies. :-)
I found the champagne bottle in a Dover clipart book, scanned it, then did a light 'wash' over it to give it a tint.
The banner at the top is part of the Scrapbooking items already in Elements, I just added the text and although it is hard to see here, did a little shading where the ribbon bends to give it depth. Plus I added a drop shadow.
Happy Retirement Marsha!!!!!

Tuesday, March 10, 2009
Addie the Math Fairy
I took time the last couple nights to just play!
So here is Addie the Math Fairy....sure could have used her when I was in school!!!!!!
The background is a page from a child's math book (from an ephemera cd). To get the "creases" in the paper, I overlaid a layer of a man's handkerchief (from another ephemera cd) that had fold lines in it then decreased the opacity.
The girl and the bird were also from cds. I made separate layers for the girls dress and bow so I could color them.
Her wings are "brushes" that I added to a separate layer and then tinted.
The numbers came from my Scrapbook Factory Deluxe program.
As you can see, I was grabbing stuff from all over!
I had a blast messing around and trying out new things!

So here is Addie the Math Fairy....sure could have used her when I was in school!!!!!!
The background is a page from a child's math book (from an ephemera cd). To get the "creases" in the paper, I overlaid a layer of a man's handkerchief (from another ephemera cd) that had fold lines in it then decreased the opacity.
The girl and the bird were also from cds. I made separate layers for the girls dress and bow so I could color them.
Her wings are "brushes" that I added to a separate layer and then tinted.
The numbers came from my Scrapbook Factory Deluxe program.
As you can see, I was grabbing stuff from all over!
I had a blast messing around and trying out new things!

Saturday, March 07, 2009
Dark to Light
I kicked my husband out of the house this morning so that I could have peace, quiet and alone time at my art desk.
I had a few ideas floating in my head and a couple new stamps on my desk.
I have been feeling pretty low lately and after talking to my friend Diane, I want to try to really focus on positive things when the negativity starts swirling around in my brain.
This piece came out of that. It works from dark to light across the board.

I stamped the asian beauty (StoneHouseStamps) with permanent ink and colored her with pencils. She is an odd stamp in that her image is just cut off straight on both sides so I had to "hide" that if I wanted to use her in the middle of the piece. I found, in my stash, the gorgeous scrap of Japanese paper - grays, tans, gold, silver.
I had to pull out a tool that I have not used in years and years....my stamp positioner! Do they even make those any more? I had purchased the "Japanese Maple" stamp (Penny Black) last week and was dying to try it out. I wanted the shadows from the branch to fall across the woman's face.
As you can see, I am still pulling out that ancient Chinese newspaper. I swear, I could use pieces of it every day and it would still be around 10 years from now LOL
The red background paper is from the Far East Mat Stack....lots of lovely papers in that assortment!
I added the swirly dragonfly (Magenta) and chop (Asian Woods) to the upper right corner. I lastly stamped the postage stamp from Technique Tuesday and colored with with watercolor pencils. Then I cut it out....all those little dents! and glued it to the lower right corner.
Now, to bring it all together -- I painted the leaves with Twinkling H2Os. (love those things!!!!) leaving the leaf shadows just plain ink. Using Walnut Stain Distress Ink, I darkened the left side of the piece. and finally, using Frost White Pigment Ink, I rubbed the entire right side.
It was so nice to be able to just sit and create. Now to find a place to display it (or anything else!) Someday I will post a photo of my art room. I have a friend that says it makes her claustrophobic as there is not a single inch of open space on the walls (or my desk top LOL)
I had a few ideas floating in my head and a couple new stamps on my desk.
I have been feeling pretty low lately and after talking to my friend Diane, I want to try to really focus on positive things when the negativity starts swirling around in my brain.
This piece came out of that. It works from dark to light across the board.

I stamped the asian beauty (StoneHouseStamps) with permanent ink and colored her with pencils. She is an odd stamp in that her image is just cut off straight on both sides so I had to "hide" that if I wanted to use her in the middle of the piece. I found, in my stash, the gorgeous scrap of Japanese paper - grays, tans, gold, silver.
I had to pull out a tool that I have not used in years and years....my stamp positioner! Do they even make those any more? I had purchased the "Japanese Maple" stamp (Penny Black) last week and was dying to try it out. I wanted the shadows from the branch to fall across the woman's face.
As you can see, I am still pulling out that ancient Chinese newspaper. I swear, I could use pieces of it every day and it would still be around 10 years from now LOL
The red background paper is from the Far East Mat Stack....lots of lovely papers in that assortment!
I added the swirly dragonfly (Magenta) and chop (Asian Woods) to the upper right corner. I lastly stamped the postage stamp from Technique Tuesday and colored with with watercolor pencils. Then I cut it out....all those little dents! and glued it to the lower right corner.
Now, to bring it all together -- I painted the leaves with Twinkling H2Os. (love those things!!!!) leaving the leaf shadows just plain ink. Using Walnut Stain Distress Ink, I darkened the left side of the piece. and finally, using Frost White Pigment Ink, I rubbed the entire right side.
It was so nice to be able to just sit and create. Now to find a place to display it (or anything else!) Someday I will post a photo of my art room. I have a friend that says it makes her claustrophobic as there is not a single inch of open space on the walls (or my desk top LOL)
Monday, March 02, 2009
Ode to Annette
A few weeks ago, while I was sick for a week with the flu, I spent a lot of time watching classic movies on tv.
One of those movies was Million Dollar Mermaid. It is the story of Australian swimmer Annette Kellerman. It is a gorgous Esther Williams movie!
The story of Annette Kellerman was a facinating one. A huge turning point for her career was when she was arrested, during a publicity stunt, for indecent exposure on a beach. She was wearing a one piece swimming suit.
If you get the chance, rent the movie....the scenes in the Hippodrome are fabulous!
 This piece is another scrap of paneling from our bathroom remodel. I used porcelain crackle on it. When it was dry I rubbed it with a rough cloth and took off the crackles. I then used antiquing gel to give it a brown stain, darker at the bottom and getting lighter toward the top.
The quote is from a newspaper story of the trial as is the photo of Annette standing on the beach.
The stamp is from Tin Can Mail and looks as if it too could be Miss Kellerman. I colored it with Twinkling H2Os. I love the rich colors and shimmer of mica.
One of those movies was Million Dollar Mermaid. It is the story of Australian swimmer Annette Kellerman. It is a gorgous Esther Williams movie!
The story of Annette Kellerman was a facinating one. A huge turning point for her career was when she was arrested, during a publicity stunt, for indecent exposure on a beach. She was wearing a one piece swimming suit.
If you get the chance, rent the movie....the scenes in the Hippodrome are fabulous!
 This piece is another scrap of paneling from our bathroom remodel. I used porcelain crackle on it. When it was dry I rubbed it with a rough cloth and took off the crackles. I then used antiquing gel to give it a brown stain, darker at the bottom and getting lighter toward the top.
The quote is from a newspaper story of the trial as is the photo of Annette standing on the beach.
The stamp is from Tin Can Mail and looks as if it too could be Miss Kellerman. I colored it with Twinkling H2Os. I love the rich colors and shimmer of mica.
Sunday, February 15, 2009
Inchies!
I could never understand the facination with Inchies. I just couldn't see why anyone would want to work on something so small.
Then, for no reason I can comprehend, I wanted to make some. Don't ask me why! I also knew I did NOT want to hand cut all those squares so I bought an Inch punch before Christmas.
I toyed with the idea for a while and then put it on the back burner as I cared for my baby. But I finally jumped in....and hosted a swap!
I figured the best way to insure that I actually made some Inchies was to host a swap....then I HAD to finish them! :-)
The theme is flowers.
I worked on them all this week. It took mind off of Tucker....sort of. He would have loved this swap as he LOVED to help with all my projects and the smaller the pieces the more fun he had playing with them. This was a project right up his alley! :-)
It was nice to be able to create and remember Tucker in a good way.
 One very odd thing. The majority of colors I used were Purple, Yellow and Pink....colors I am not wild about and as far as Yellow....Hate! Very Strange LOL
Then, for no reason I can comprehend, I wanted to make some. Don't ask me why! I also knew I did NOT want to hand cut all those squares so I bought an Inch punch before Christmas.
I toyed with the idea for a while and then put it on the back burner as I cared for my baby. But I finally jumped in....and hosted a swap!
I figured the best way to insure that I actually made some Inchies was to host a swap....then I HAD to finish them! :-)
The theme is flowers.
I worked on them all this week. It took mind off of Tucker....sort of. He would have loved this swap as he LOVED to help with all my projects and the smaller the pieces the more fun he had playing with them. This was a project right up his alley! :-)
It was nice to be able to create and remember Tucker in a good way.
 One very odd thing. The majority of colors I used were Purple, Yellow and Pink....colors I am not wild about and as far as Yellow....Hate! Very Strange LOL
Saturday, February 14, 2009
It has been over a week since I have posted anything.

My last post was on Feb. 4. On Friday, February 6, my beloved little Tucker lost his battle with kidney disease. It was the hardest thing I have had to endure, letting him go.
He was such a huge part of my life. I talked to him constantly (and he listened and replied). I keep expecting to see him peeking around the corner at me or sitting in his bed when I turn around.
Last night I was eating ice cream and did what I always do, I called for him to join me.
It is so hard trying to adjust to him being gone. Hopefully the pain and loneliness will subside.
Wednesday, February 04, 2009
Things have been really stressful around here. My poor little baby, Tucker, is sick and that takes all my thoughts and energy worrying about him.
I finally realized I needed to at least try to create....something.
I found some wood scraps in the garage, paneling left over from our bathroom remodel of 2 years ago. I had hubby cut it into usable pieces and I sat myself down at my desk.
The first one is a house shape. It is about 3 1/2 inches tall (plus wire hanger). I painted it off white and coated it with Porcelain Crackle. When the crackle had dried, I rubbed on some Walnut Distress ink and then wiped off the excess. When you get really close you can see the cracks. Unfortunately, my macro isn't working right so I couldn't get that close. I guess I need to dig out my bigger camera and charge up those batteries!
The woman came from the Stage Beauties CD from enchantedmercantile.com The music (Oxford Impression) was stamped in black permanent ink and rubbed off a bit before it was completely dry. The typewriter key font is from Nostalgiques.
I added the wire and buttons both as a hanger and as a fun addition.
 This one is about 4 1/2 inches tall (plus wire hanger). The Chinese writing is from an old newspaper. I used Mod Podge to glue it down and then washed red acrylics over the whole thing. When that had dried, I rubbed Walnut Distress ink all over rubbing some off in places. The bamboo is stamped with chalk ink. The "stamp" and cancellation were also stamped with chalk inks. The women are from another CD from Enchanted Mercantile, Vintage Ephemera Vol.1.
This one took me a lot longer as I kept changing my mind about what I wanted but the farther along I got the more I liked it. There is even a little sparkle, I tried out my Glimmer Mists before I added the women. It is very subtle and hardly noticeable until you tilt it just the right way LOL
I finally realized I needed to at least try to create....something.
I found some wood scraps in the garage, paneling left over from our bathroom remodel of 2 years ago. I had hubby cut it into usable pieces and I sat myself down at my desk.
The first one is a house shape. It is about 3 1/2 inches tall (plus wire hanger). I painted it off white and coated it with Porcelain Crackle. When the crackle had dried, I rubbed on some Walnut Distress ink and then wiped off the excess. When you get really close you can see the cracks. Unfortunately, my macro isn't working right so I couldn't get that close. I guess I need to dig out my bigger camera and charge up those batteries!
The woman came from the Stage Beauties CD from enchantedmercantile.com The music (Oxford Impression) was stamped in black permanent ink and rubbed off a bit before it was completely dry. The typewriter key font is from Nostalgiques.
I added the wire and buttons both as a hanger and as a fun addition.
 This one is about 4 1/2 inches tall (plus wire hanger). The Chinese writing is from an old newspaper. I used Mod Podge to glue it down and then washed red acrylics over the whole thing. When that had dried, I rubbed Walnut Distress ink all over rubbing some off in places. The bamboo is stamped with chalk ink. The "stamp" and cancellation were also stamped with chalk inks. The women are from another CD from Enchanted Mercantile, Vintage Ephemera Vol.1.
This one took me a lot longer as I kept changing my mind about what I wanted but the farther along I got the more I liked it. There is even a little sparkle, I tried out my Glimmer Mists before I added the women. It is very subtle and hardly noticeable until you tilt it just the right way LOL


Tuesday, January 27, 2009
Learning Cake Decorating
I have wanted to learn cake decorating for a long time. Who wouldn't want to be able to make all those gorgeous (and edible) flowers?!
My mom, knowing this about me, gave me all kinds of goodies to get me started on my way. Thanks Mom!!!!
So, this past weekend, I finally got up the nerve to start. I was going to just practice on a plain vinyl cutting board but hubby said, "No, if you are making things with icing, then they are edible and we are going to eat them". Hmm
Thus, I had to back up and make cupcakes first LOL
I thought I would start out simple...I chose to try the shell border. I did pretty good with this. I mean, how big of a border can you have on a cupcake? LOL
 After several bordered cupcakes, I decided I was ready to move on. Keeping the same tip...did I mention I am lazy and don't like to get my hands messy?...I tried my hand at rosettes.
 Next came leaves. Who has flowers without leaves? Well, possibly me LOL I finally got the hang of getting the leaf shape BUT all my leaves have 2 tips...not the traditional tree-type single tip. Guess I need to practice more.....or tell eveyone that I pruned before they arrived!
 Mary, who knows how to decorate cakes, is probably going to read this blog and die laughing! LOL
My mom, knowing this about me, gave me all kinds of goodies to get me started on my way. Thanks Mom!!!!
So, this past weekend, I finally got up the nerve to start. I was going to just practice on a plain vinyl cutting board but hubby said, "No, if you are making things with icing, then they are edible and we are going to eat them". Hmm
Thus, I had to back up and make cupcakes first LOL
I thought I would start out simple...I chose to try the shell border. I did pretty good with this. I mean, how big of a border can you have on a cupcake? LOL
 After several bordered cupcakes, I decided I was ready to move on. Keeping the same tip...did I mention I am lazy and don't like to get my hands messy?...I tried my hand at rosettes.
  Next came leaves. Who has flowers without leaves? Well, possibly me LOL I finally got the hang of getting the leaf shape BUT all my leaves have 2 tips...not the traditional tree-type single tip. Guess I need to practice more.....or tell eveyone that I pruned before they arrived!
 Mary, who knows how to decorate cakes, is probably going to read this blog and die laughing! LOL
Subscribe to:
Posts (Atom)