Saturday, November 19, 2016

I can't believe Thanksgiving is next week!

Wow! Time sure flies by the older you get! Why is that???

I swear, I really have been busy.I have been making my Christmas cards. No 2 people get the same card so I am constantly dreaming up new designs.

I thought I had been photographing each one as I completed it but when I downloaded my pictures I realized I have only captured a small handful. I guess that means I need to get busy taking more pictures!

Just a word of warning.....this is a picture heavy post (yeah, aren't they all? lol)

These cards were all made with my Cuttlebug and dies from Anna Griffins Seasonal die set for Winter and Christmas


For this card I cut the deer twice and cut off the antlers off one of them. The embossing folder is called Holiday Knit from Sizzix/Tim Holtz. I embossed red card stock that had a white core. I then rubbed it with sandpaper to let some of the white show.


Aren't these dies just gorgeous? I cut the holly 6 times from a couple different green papers. I used Cricut's pearl paper for Peace. It has a lovely sheen.


It seems to be a poinsettia Christmas this year. I have several other cards and some package toppers that also feature poinsettias. Each flower was made by cutting the image twice and then layering them. I used gold Stickles in the centers of each. I think the Merry Christmas might be from Anna's Festive Words cutting die set but I know it also exists on one of her Christmas Cricut cartridges.


This bell shape is from Anna's Christmas Cards and Embellishments 2 cartridge. I turned the embellishment image into a card. I used Cricut's new glitter card stock for the first time. It cuts beautifully!

If you own this cartridge you can cut this card yourself.
https://us.cricut.com/design/#/canvas/44929826


But I haven't just been making cards.


I had seen some projects online using cutting dies to create a jack o'lantern jar. I have a Cricut and tons of cartridges so I designed my own.

The mason jar is from the CTMH Flower Market cartridge. The face is from CTMH Artbooking.
I added a small box to the back to hold the candle and also work as a counter balance.

If you own the above mentioned cartridges you can make this project.
https://us.cricut.com/design/#/canvas/46180447


I have been wanting to make this house since it came out a year or 2 ago. It is SVG Cuts Haunted Forest. I was intimidated by all the curves but it actually was very easy to assemble.


This is the project I completed this morning....a gingerbread house.
I used SVG Cuts Peony Cottage as my house and then searched through Cricut Design Space for embellishments. I think it turned out really cute. Hubby thinks it needs more candy (but he says that about the real gingerbread houses too lol)

I used tan card stock for the entire house and rubbed Tea Dye Distress Ink over all the edges. The roof and bottom step were covered with card stocks from the Classic & Retro Christmas pack from Authentique (#CRE500) I don't usually say what papers I used because I either have no clue or they are so old they aren't available any more but I just bought this pack last week and it has some really great stuff in it.


I told you I have been busy!
My sister's birthday is next week and she is a huge Buckeye fan - all the best people are! :-)

I wanted to make her something different so I came up with this shadow box. 

The O-H-I-O fans and the Ohio State logo are cut from vinyl and applied to the back of the glass.
The Columbus skyline is cardstock. I lined the back wall with glitter felt so it twinkles in the light. And ran a string of firefly lights throughout. I like it, I hope she does too.

So that covers everything that I remembered to photograph but I have one more thing to share.


I say all the time that I love yard sales and estate sales. It's so much fun to rummage around and come home with treasures. 

At an estate sale this summer I found this adorable little house. The beautiful flowers on the upstairs porch, the adorable children sitting on the steps! It is about 3x3 and it's a bank. It is cast iron and still has it's original paint. I fell in love with it from across the room and thought I might have to knock some people down to get to it lol

No one wanted it because the bottom insert is missing (which serious collectors say is a no no). But you can't even tell that when it is sitting on the shelf (you wouldn't have known if I hadn't told you now would you?!)

I found several online that have sold for anywhere from $50 to $100 some in far worse shape than mine. So I am ecstatic that I was able to grab this beauty for only $12! It sits on my mantle where I can see it every day.

That covers everything for now. Thanks for sticking around to the end lol

I wish you all a very Happy Thanksgiving and a joyous holiday season!

Friday, September 09, 2016

Happy Fall!

Well it is almost fall so I am decorating.....like it or not! lol

It has been a busy few weeks. I have no clue what I was doing I just know that I never seemed to have enough time to get much done and felt like I was spinning around.

But I managed to find a few minutes here and there to get my creative on.  :-)

If you have been here before then you know that I know how to color....I have been coloring with colored pencils for decades. But I signed up for the 8 week coloring class from Crafter's Companion. Why? Because it is FREE! lol  And I thought, hey, you never know, I might learn something.

You can sign up too....it is free after all.  :-)   You can find the info here.

I have actually learned a couple things I never heard before like when you sharpen your pencils turn the sharpener not the pencil. Never heard that before.  And one of the videos gives tips on how to try to mend a pencil that the lead is all broken inside. I definitely need to try that out as a couple of my Prismacolors have nothing but bits and pieces inside....they have since I bought them so I am thinking the stores don't really take a lot of care with them.

They also give us free downloads to play with. How on earth do you pass up free? lol


We received a page full of bookmarks to practice coloring. I was not thrilled with how this turned out. I didn't really like my color choices once I was finished. So I discovered something else (my own tip lol). Since I printed my stuff on my laser printer I can run it through my Minc and foil it......Foil hides a multitude of yukkiness! The shine distracts from the ugly colors! HaHa  Maybe I should credit Minnie with this tip since she seems to think everything shiny is much better than non-shiny lol


There she is, my adorable, little Minnie.  :-)

My Explore has not been sitting idle. (in case you were worried)


SVG Cuts has a new kit that just came out last week. It is called Harvest Sunset.

These sunflowers are 7 inches across (not including the leaves!)
It is not very often that I find something that dwarfs my pottery jug. I bought it in Colonial Williamsburg at least 25 years ago and rarely get to use it because everything looks tiny when I try to display it. lol

I used really cheap card stock (because I can't stand the color yellow and rarely buy it) The card stock came in a bulk pack of something like 200 sheets on Black Friday many years ago. Such bright and odd colors and yet, the perfect sunflower yellow. And just so you know, sunflowers are the only yellow flowers that I like. They say "Fall" to me. :-)

And of course I made a card. It seems like I am constantly needing birthday cards! lol

My brother in law just began running marathons this year. We are all so proud of him. I have days where I can barely hobble across the street and he is running!


I created this box card. All the medals were run through the Minc so they are nice and shiny and gold!  When I completed it I just kept thinking it needed something so I let it sit on my desk for about a week.


I then added a cheering crowd.  If I was running (which will never happen lol) I would certainly want people cheering for me!  :-)


And like I said earlier, I am in full on Autumn mode!!!

I saw a window at a yard sale last Saturday. 


It was already painted black. A shiny black lacquer. We don't do shiny paint in my house so I had to fix that but what is up with all the 1 inch double sided foam tape squares? They (or remnants of them) were around the entire frame, on the cross bars and on the glass! What on earth were they trying to stick to this window??? lol

I peeled them all up, scraped off what I could and then spritzed all the sticky spots with WD-40 and let them sit a few minutes then scraped again.  What I couldn't remove that way disappeared with the sander.


You can sort of see how shiny this was down at the botton of the frame. I sanded the entire thing several times to distress the edges and remove the shine (yet still keep most of the black paint)

BTW the yellow bars are my saw horses I had the window propped on while I worked.


My original plan was to do the entire thing in vinyl. My vinyl had other ideas.

The text in the top panes is done in dark brown vinyl.
After destroying every sheet of orange vinyl I owned I switched to paint for the pumpkins. They are reverse painted on the back of the glass which means you start with the highlights and shadows first and build your colors.

I am really pleased with how it turned out. The window it about 34 inches wide so it is taking up a good size piece of the wall and yet fits beautifully. So much so that hubby suggested we leave it up all year round.  :-)

That about catches me up. I hope you have all been able to get some crafting done as well.

Happy Crafting and Thank You for stopping by.  :-)

Friday, August 19, 2016

33 Days Until Fall

Summer is probably my least favorite season just because of the heat. And with the high temperatures we have been having it makes me crave Fall even more! They are saying we will hit 110 degrees tomorrow. That is just crazy!!!

Not venturing outside gives a person more time to play in the art room.  :-)

I am not sharing much today because most of what I did was trying out new dies and such that came this week....almost like Christmas lol

I did actually toss together a few cards.

Like I said above, I am ready for fall!


I am still playing around with my Tim Holtz 'crazy' stamps while I wait for the dogs to arrive. My order is supposed to be here sometime in September. :-D

The embossing folder is from Cuttlebug. It is part of a set of folders (but I only have this one I bought in a clearance bin at the local craft store). I think the set might have been Happy Haunting.

The images were colored with Copic markers.


 This adorable little kitty is from Close To My Heart. It is from the August stamp of the month set S1608 Purr-fect Halloween. The cat body has no eyes or adornments but lots of stamps to create a costume with 4 sets of eyes, a couple hats, the bat (which I used as a bowtie), a pennant banner and some phrases. I also added the jack o'lantern from Tim Holtz's mini Bird Crazy stamp set.  All images were colored with Copic markers.


I have a friend whose birthday is on Halloween so she gets 2 cards from me every year. :-)
I used the Acorn Scatter embossing folder from Anna Griffin's summer/fall folder set. The leaves and feather are from her summer/fall die set. The sentiment was written by my Cricut Explore and I am 99% sure it is from an Anna Griffin cartridge.


Close To My Heart released a brand new Cricut cartridge on August 1st. (and retired several of their older cartridges)
The new cart is called Flower Market and has tons of flowers - both 3D and 2D. I thought these 2D ranunculus were very pretty. Lots of cool containers to display your flowers like the jar with lace band I used. They also have fun icons and 2 fonts. It is a gorgeous set of images.
You can get one from my friend Debbie on her CTMH site

I used Darice's Fall Leaf Background folder and ran it through my Cuttlebug.


I told you I was trying out new toys this week. Not only did I get a cartridge and stamps, I also got some new cutting dies. This lacy oval is one of Crafters Companion's Downton Abbey dies. You can cut the lace to be a free standing oval or cut it like I did so that it is in the paper (no outside edge). It then comes with several smaller oval dies that fit in the center. I also got the circle, square and rectangle sets.....What? I had a coupon and they were grouping 2 sets together in each package. Trust me it was a good deal lol

And now I have officially made my first Christmas card of 2016.

But I am not quite done.


Sometimes I just get in the mood to play with supplies I haven't pulled out in a while. 
That would be my embossing diffusers from Tim Holtz. This is the circle one.
I used Anna Griffin's Fluted Damask folder. I then stamped the cupcake (CTMH Art Philosophy Cricut bundle D1497) in 2 colors (CTMH Hollyhock and Cocoa)
I felt it still needed something so I cut some 3D flowers on the Explore and glued them around the lower left edge of the circle.
I think it turned out cute and now I have another card on hand for....whatever.  :-)

So that covers most of what I did this past week.
I hope you are all staying cool wherever you may be.

Happy Crafting!

Tuesday, August 09, 2016

Until next year...

No, I am not going away for a year... well let's hope not anyway lol

The Index Card a Day challenge is over for this year. The last day was July 31.
I completed all my cards, I just haven't had a chance to get on here and show them to you.

I have the last 2 cards to share with you today.

Day 60: Sorbet


I am not a fan of sorbet. I prefer ice cream. :-)  So, I focused more on the ingredients than the actual product lol

This was done with watercolor and Inktense pencils.


Day 61: Path


This verse and song immediately popped into my head so I went with it.

Again, watercolor and Inktense pencils and Sharpie pen.


I want to keep drawing every day but it is so hard to stay motivated so hubby bought me a book called "642 Things to Draw" from Chronicle Books.  It is a large book full of nothing but blank pages with a prompt on each page. Like today was 'desk chair'. Nothing exciting but it made me draw a chair. I have worked through several of the prompts so far....my book now contains a skunk, a seagull, a rolling pin, a hammock....and a few others.  So far I am liking it. I spend about 10 minutes a day with my book and pencil which is always a good thing. 

But, I have been doing other things too. You know we have holidays coming up and I wanted to get started on some cards.

First, my sis-in-law has a birthday in November. Yeah, that is a bit far away but an idea struck so I made the card (it was that or probably forget the idea....or the birthday lol)


This was made with Anna Griffin's Floral cutting dies. I love how simple yet beautiful they are. The background is also from Anna Griffin, her chrysanthemum embossing from from her Summer/Fall embossing folder set. I sanded it after embossing to make the design show up better.

Last time I showed you a Tim Holtz Crazy Cat that I had colored but didn't know where he was going to be used. Well, I put him on a card. I had intended for a cute/quirky card and ended up with a sort of creepy Halloween card. lol


I would be a little freaked out if I saw a 'crazy' bird in a tree calling to me lol

And of course, once you start playing with these birds and cats you can't stop!


Some silly Trick or Treaters


Scaredy Cat!


And of course more cats looking for homes lol

I also thought I would share a few pics from our mini vacation (the reason I didn't get my ICAD cards posted right away)

We headed over to the coast for a long weekend. It was cool and breezy....much nicer than the triple digit temps we get here at home in the summer.


This is Battery Point lighthouse in Crescent City, CA. I did a painting of it for one of my ICADS a couple weeks back.
It was overcast in Crescent City and the wind was blowing like crazy!  We walked way out on the fishing pier to get this great, straight on shot. (and froze our butts off lol)


This is Cape Blanco lighthouse just north of Port Orford, OR.  Normally the winds are so strong it is a struggle to walk around. Not this time, it was down right balmy and calm....and gorgeous!

This lighthouse sits on the farthest west point on the Oregon coast (and some say the farthest most west point of the continental US)


And last, Coquille River lighthouse in Bandon, OR.
It was getting late in the day so I was looking into the sun when taking my pictures. (which is better than standing out in the roaring river I guess lol)

This lighthouses sits in Bullards Beach State Park. It no longer has a light in it but is still a beautiful building and worth the drive out to the beach to see it.

If you want to see and learn more about Oregon lighthouses, hubby and I have a website. It also has information about Oregon covered bridges, vintage camera, trains and of course, Tucker's website. Check it out at http://www.tunnel13.com/

Thanks for stopping by and Happy Crafting!!!

Friday, July 29, 2016

Only 2 Days Left!

The Index Card a Day Challenge is winding down. It makes me sad when it ends. I really enjoy getting into my art room and creating something every day.

I have a problem motivating myself to do it....it is nice to have someone else sending me daily prompts!

Here are my cards from the past week.  

Day 53: Fortune


The first thing that popped into my head was 'fortune cookie'. I keep all my fortunes in a box in my ephemera drawer so I pulled that out and sifted through them until I found one I liked.

This one says "The coming month shall bring you much happiness"

I drew the scene with my Pilot Color Eno soft blue pencil and colored it with Inktense pencils.


Day 54: Aquarium


My initial thought was to draw one of those deep sea diver figurines you see in aquariums but most of the photos online had him with a treasure chest (and a knife....to fight off other treasure hunters? lol)

I decided I liked the treasure chest more than the diver. I always wanted one in my aquarium but my college roommate never let me add one.....too tacky lol  I never had an aquarium after college...too much work I guess.

This was done with Sharpie pen, Inktense and watercolor pencils.


Day 55: Olympics


I was going for a vintage postcard feel.

This is Sharpie pen and Inktense pencils.


Day 56: Text or Texture


This was a tough one for me....not just figuring out what to do but actually physically doing it.
I had gone to the chiropractor earlier in the day. My shoulder was killing me. He adjusted my shoulder, then my elbow and then my wrist.  Everything was so sore I could barely move my arm (for about 24 hours!!!)  So drawing/painting was out of the question unless I just did finger painting lol

I ran my card through my Cuttlebug for the texture. This is a folder from a company called Life Style Crafts. No clue where I bought it....I have never seen them since. But it is very cool diamond pattern don't you think?

I then rubbed CTMH Crystal Blue ink over it and then CTMH Lagoon over the corners.

The text is also from CTMH. The "Always Grateful" set #C1559 stamped in black StazOn ink.


Day 57: Stickers


I used to be heavily into stickers. I had boxes and boxes of them. I would cover the envelopes of all my cards with them. But I misplaced them when I made the move out west and didn't find them for a couple years so I lost interest in them. As a matter of fact I bagged up most of them and sold them at my yard sale just a couple weeks ago (about 1000 stickers for 50 cents. Some little kid is now having a blast with them!

So when this prompt popped up I had very few stickers to chose from (and this is exactly the reason I never get rid of anything.....as soon as you do you find a use for it!!!)  LOL

I painted a mountain lake and plopped a couple Hallmark goose stamps into the water enjoying a refreshing swim.  :-)


Day 58: Graffiti


I was going to just add 'graffiti' to a wall but then decided I wanted to include the artist. :-)

I drew the girl with a Sharpie pen.

I dug around for a stencil of bricks but didn't like the one I had so I hand painted them instead. 
I then painted the graffiti. (you can see the bricks peeking through on some of the lighter colors)

"Rule" was added with a fine tip Sharpie marker.

I still needed something... I had been playing with my Crazy stamps earlier in the day so I grabbed the girly looking mini bird and added her to the bottom right corner.


Day 59: Hopscotch or TicTacToe


When I was a kid we would save up colored chalk and draw our board out on the playground (and hope it lasted for a few days). You then searched for a nice flat rock (they didn't bounce as much). We would play during every recess. Do kids even play hopscotch any more or is that too old fashioned?

I painted the entire card black with acrylic paint. I then added the Hopscotch board with Prismacolor pencils. I have found that these pencils (especially the white) have a chalk like look when you write over black paint (yet they don't rub off like chalk)

I then drew and colored the girl on a separate card, cut her out and glued her down. She could have been a bit bigger. Oh well. :-)


Only 2 days left in the challenge. I am not crazy about either of the prompts so this might be a struggle lol


And of course I did do a couple other things this week.

The stuff I ordered from the HSN all day craft day on July 6 arrived last week. It is so difficult to NOT buy something. They introduce so many cool products! I only ordered 2 things (but had a couple things that arrived on AutoShip from a prior all day craft day lol)


This is a birthday card for my father in law. His birthday is not until October but my Seasonal Cutting Dies had just arrived and I had to try them out!

I used the 2 leaf dies from the new set. (my Seasonal Folders didn't arrive until after I finished the card so I guess I need to make something else) ;-)

The sentiment is from Anna Griffins Fantastic Flips card kit from clear back in January (I think). The scroll frame is from one of her Fancy Frame die sets (these sets are gorgeous!) If you ever get the chance to buy them don't hesitate....just do it! They cut and emboss beautifully.

I inked the leaves with Distress Inks and added a strip of brown, embossed satin ribbon. 

It is a pretty simple card but when I gave it to hubby for his dad his first reaction was "Wow!" :-)


And lastly, I mentioned early in this post that I had been playing with my 'crazy stamps'.
That would be Tim Holtz Crazy Cats (and some birds....and anxiously awaiting the arrival of the dogs!)

I was feeling a bit down yesterday so I stopped into the local craft store (just a block from my house). They are a small mom&pop store that carries mostly high end craft supplies. It is so much fun to just browse.

Anyway, like I said, I was a bit blue so I just wandered....and found the die set for the Crazy Cats stamp set.  I have the dies set for the Bird Crazy set - well I am missing the die for the round, short bird - we won't go into that as it causes arguments around here as to who's fault it is that it is gone.

So, anyway, the dies came home with me to make me feel better. And of course I needed to 'test' them.
I stamped one of the cats, colored him with Copic markers and then used the die to cut him out. 


I could have lined up the die a bit better, especially at the bottom, but overall, not too bad. And much easier than hand cutting!

I think he turned out pretty cute....hmm I wonder why I think he is a HE when he is so pink?! LOL

I am going to spend some time today creating a card for him to live on.

Thank you for sticking around through all my rambling today! 

I hope you are all staying cool and avoiding this heat as much as possible.
Have a fabulous weekend and Happy Crafting!!!


Friday, July 22, 2016

The end is in sight

I am kind of sad about that. 
The ICAD challenge ends on July 31. I really like the motivation to get into my art room and create something every day. I just can't seem to do it on my own.

I need to hire someone to send me a daily prompt! lol

Here are the cards from this past week.

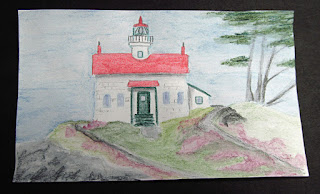
Day 46: Lighthouse


This is Battery Point lighthouse in Crescent City, CA. We stop by every time we go over to Brookings, OR. It is just a few minutes across the border.

I used Inktense pencils and drew from a photo I had taken on a past trip.


Day 47: Monochromatic


I actually did not get this one done on the 47th day. Not that I didn't try. I started several cards and just could not come up with a good idea (so now I have a bunch of cards with random garbage on them lol)

I am not crazy about this either but at least it is done.

I used plain blue/gray cardstock. I ran it through the Cuttlebug with Darice's Fall Foliage Background folder. I rubbed white ink over the embossing then tore out the text from a sheet of scrapbook paper that had blue/gray text. 

Again, nothing too great but it is done lol


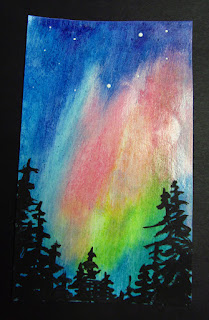
Day 48: Aurora Borealis or Australis


I based the card with white acrylic and then used Gelatos for the sky and black acrylic paint for the trees. I then dotted the sky with white acrylic.

I love the creaminess of Gelatos and the gorgeous, rich colors.


Day 49: Superhero


Drawn with Sharpie pen and colored with Inktense pencils.
His hands are horrible. I think I need to practice drawing hands! But his shirt folds and tie came out nice. :-)


Day 50: Paisley


Have you never heard of the rare and exotic Paisley Fish?  ;-)

I used the basic paisley shape for the body and then began doodling.
I then colored him (her?) in with Prismacolor pencils.

I wanted to wash watercolor over it for the water but wasn't sure that the pencil would resist enough so I dug around on my shelf. I found a bottle of Liquitex Glossy acrylic sealer (that says is permanent when it dries). I had picked it up at an estate sale a couple years ago (that and a matte one). Full 16 oz bottles. I think I paid a quarter a piece. I never actually read the labels, only that they were sealers. Well this stuff is awesome! It goes on like any other acrylic sealer but I was able to brush water color paints over it once it was dry and it did not become sticky or anything and retained it's glossy surface. So my fish and bubbles have a nice shine to them.


Day 51: Purple or Violet


Another one of those totally uninspiring prompts.

After several failed starts I grabbed a piece of acetate (I have lots of it from the Cricut cartridge packages lol) I cut it to the size of my index card and dribbled turquoise, cranberry red and 2 shades of purple on the back. I let them blend together and dry. I then glued it onto my card which I had rubbed Dusty Concord Distress Ink on the corners.

It still needed something and my Anna Griffin seasonal embossing die set had just arrived that afternoon so I cut out the feather in white card stock, rubbed the Dusty Concord on it and then some Aged Mahogany and glued it onto the card.

The colors are much prettier in person as it is next to impossible to get a decent picture of glossy plastic lol


Day 52: Staircase


The first thing I thought of was this picture of Tucker from many many Christmas's ago. He loved to chew on fake pine greenery (Heaven only knows why! lol)  And he would sit on the steps and spy on me from behind the swags. I would glimpse him out of the corner of my eye and if I turned he would duck down. Silly baby lol

I am still not sure how I got this picture other than at that time he still like to pose for pictures (he became more camera shy in his old age)


This is my interpretation.
I used Inktense pencils (well of course I did! lol  I absolutely love them. The colors are just wonderful)

So only 9 days left to the challenge. And then back to.....well I am not sure what I will go back to except maybe starting my Halloween cards lol

Until next week....Happy Crafting!