Showing posts with label Cuttlebug. Show all posts

Sunday, February 11, 2018

Happy Valentine's Day

I like Valentine's Day or maybe I should say I like any day that makes someone buy me chocolate lol

I used to decorate for Valentine's Day and put up lots of hearts and doilies. But not any more. I am getting old and lazy lol.  But I still make cards....or try too. I am way off track this year and just finished my parent's card today. And since it is Sunday, I can't mail it until tomorrow which means they probably will not get it until the 15th. Oh well, can we really only tell people we love them on the 14th?


I made a shaker card! I used Anna Griffin's shaker card dies. And Cuttlebug's confetti dies for the 'filling'.
The patterned card stock came from a new Recollections paper pad called Girlsquad. It has lots of cute Valentine papers. 

I struggled with this one. Not in the making but in the 'do I really like this?' stage. The die set is really nice as it gives you dies to cut the window in your card base, the window in your card front and lots of embellishments. But I just wasn't feeling it until I got all the embellishment in place. I think the rose finally did it for me. That came from some freebie I got with an Anna Griffin order lol  And it had all kinds of swirls and stuff with it that I had to cut off. But I think it was worth it. I hope my parents like it.


In my last post I said I had just received my Dina Wakely Media journal. The 8x10 version came out last year (at least I think it was just last year and not earlier than that). What is cool and different about it is that it has 4 different substraights in it.....watercolor paper, canvas, kraft paper and burlap....all in one journal! 

She brought out a larger version this year at Creativation but there is no way I would have space for it or comfortably be able to fill such a large work space. (I tend to work small so the 8x10 is already going to push me outside my comfort zone)
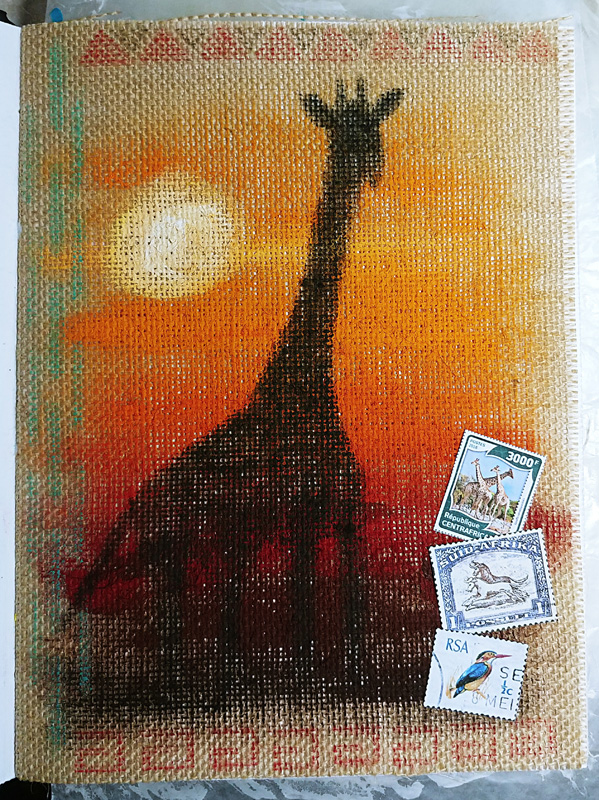

I jumped right in with burlap! I have never worked on burlap before. I tend to avoid it at all costs due to the smell and that fact that something in it (maybe all those fibers) makes me sneeze.  So, with tissues at the ready, I dove right in. I used acrylic paints in reds, oranges and yellows to create a sunset background with white and pale yellow for the sun.

I then used Dina's Scribble Sticks in black to draw a giraffe. It is tough to get a straight line on burlap! So I have a stylized giraffe lol
I then used Scribble Sticks for the patterns around the sides but it still needed something.
I googled African postage stamps and found some I liked. I printed them on regular printer paper so they would feel more like the real thing. I cut them out and glued them down with Aleene's Tacky Glue. 

So now I need to decide my next step. I am thinking of washing a medium to dark color over the stamps, or at least part of them, to help settle them into the background a bit. But it is a work in progress so I will mull it over for a bit.


Here is a page on the watercolor paper. I watched one of Dina Wakely's YouTube videos on drawing faces. Faces are not my forte. If I spend long enough on them (like hours and hours drawing) they turn out fairly well. This was a fun way to create a face in a short amount of time. 

I tend to be very rigid in my drawing and painting. I see people all the time that freely slap paint on canvas without any obvious direction and they just let the colors and forms guide them. I have never been one of those people. I have to see it all in my mind before I can even start. I want to see if I can be more loose and free in this journal. I don't think there is anything wrong with my creative style...it's worked for me for over 50 years....but there are days lately where I desperately want to create something but don't have the time to think it all out in advance. I want to be able to open to a page and just brush on some color and then be able to walk away and come back later and apply something else...no pre-planned ideas. 

Wish me luck! lol

So that is all I have for this week. I still need to make a Valentine for hubby (not much time left for that one!). And my brother has a birthday next week so I need to get that done as well. My bullet journal did not keep me on track this week! lol

If your weather is even remotely like mine....stay warm! And Happy Crafting!

Sunday, December 03, 2017

22 Days Until Christmas!

Have you started your shopping yet? Or maybe the more important question is.....Have you started making your gifts yet???

My answer to both is yes. Although I haven't gotten much completed yet. I just don't know what to make or buy this year. I think lots of people will be getting gift cards in fancy holders lol

The last couple months have been sort of a blur. My mom got sick in late September and worrying and praying for her has taken up most of my mental space. She is doing really well and the doctors give us hope that there will be a full recovery. Praise God!

During these past months my muse kind of went into hiding which is fine because I wasn't up to listening to her anyway.

I did manage to make a few things (actually a lot more than I realized when I downloaded all the pics from my camera). I will only share the few I liked the best. (Just because you made stuff doesn't mean it was any good lol)


Here is the card I made for my sister in law. I used one of Anna Griffin's parchment layers for the background. I find working with the parchment to be very relaxing (which is what I have needed lately)
I used Print Then Cut on my Cricut Explore to make the bird on the branches. 


Here is the Thanksgiving card I sent to my parents. Again, a parchment background. I just love the delicate, lacy look.  The flower vines were cut with my Explore. The turkey was Print Then Cut. I find myself using PTC much more since I bought the Kodak Verite 6 Anna Griffin printer. It works great with my Explore and prints beautifully.


One more parchment based card. I told you I was enjoying it lol
The white lace snowflake border/edge is from Anna Griffins holiday edge dies. The Poinsettia, cut from Cricut glitter card stock, is from a seasonal set of Anna Griffin dies from 2016 and the pine boughs are from her Christmas Botanicals set. Also from 2016. All cut using the Cuttlebug.

I think this was the best Christmas card I made this year.  (I forgot to photograph 90% of them so you will just have to take my word for it lol)  It's elegant and yet very simple. I was tempted to keep it just so I could hang it on my own wall.


So, changing gears, this is glitter HTV on a black t-shirt.  Isn't it adorable???

I joined a membership group called Makers Gonna Learn. This is one of the files we received in the first month. (I think there were 30 in all)  You should really check it out. It is run by Tanner Bell. If you haven't seen him before check him out on YouTube. His enthusiasm is infectious. 

You can check out the Makers Gonna Learn site here


And lastly, the new Cricut Maker machine was launched this past summer. Did I need a new machine? No.....defintely No. I have the original Cricut, the Expression, the original Explore, and the Air 2. Why on earth would I need a 5th Cricut machine? 

Well, it cuts fabric! And etches metal (I need to take pictures of the dog tags I've made) and they are making additional tools to use in it. It comes with a rotary cutting blade! How cool is that.

The giraffe above is about 14" tall, made of flannel with felt mane and tail and cut entirely by the Cricut Maker. Wow!

I really did say over and over that I did NOT need this machine. And then hubby and I watched the launch on HSN in October. HSN really is a dangerous place!!!  But seeing it made me question my decision and surprisingly enough made hubby question it as well. He decided I DID need it and offered to split the cost with me. I was online ordering immediately lol

I have not used it a lot yet....but I have been pretty preoccupied lately. I am hoping after the holidays to really dive in and make some more projects. I have all the materials set aside to make a little fox doll wearing a vest. I think it will be super cute.

But until then I am happily praising God as he continues to heal and strengthen my mom and rejoice in the upcoming birthday of our Saviour.

Until next time, keep warm and Happy Crafting!

Sunday, September 24, 2017

Happy Fall!!!!!

Fall is my favorite time of year. The cooler temperatures, blue skies, colored leaves, apples and PUMPKINS!

Yesterday we headed out to the farm and bought our first pumpkins of the season! :-)

I'm sorry I haven't been here for a few weeks. My mom got sick. My parents live on the opposite side of the country so all I can do is worry, pray and spend a lot of time on the phone checking up on her. It puts a damper on my crafting spirit and decreases my crafting time....but that's ok. My primary goal right now it to get my mommy well.

But, I do have some things I made before she got sick AND a few things I have been working on the past few days. (the better she feels the more my creativity comes back) :-)

This first item I actually made a couple months ago. I just finally got around to downloading it off my camera lol


In July I started participating in virtual races because my sister wanted me to do the RockNRoll 5k in Las Vegas in November and I am totally out of shape. She convinced me to start doing virtual races to get into walking. Well, I am now not going to go to Las Vegas....saving up for a much bigger trip. But I am still doing the virtual races. It turns out that if you dangle pretty things in front of me I will actually get off my butt and exercise! lol

I have completed 7 races and am almost done with the 8th ranging in distances from 5k to 40 miles. And I have a collection of really cool medals to show for my efforts! (I will get some pictures of those for a later post)

Needing a place to display my hardware, I created this board. I used my Cricut Explore to cut vinyl to use as stencils. I added cup hooks across the bottom to hand my medals.


I'm not sure if I've mentioned this before but my mom loves tote bags. I mean she really LOVES them. She has tons of them! lol  I have made or bought her several over the years.

When I got my Easy Press I knew I needed to make her another one.

The bag itself came from Walmart. It is one of their shopping bags. They are usually on a rack near the door and cost $4.00. They are fairly large, have a magnet closure at the top and are made of a medium weight canvas. I don't know that I could make it for less then $4.00.

I used both glitter and lite Cricut heat transfer vinyl.


The pelican/beach, turtle and crab are from the Life is a Beach cartridge.
The sun is from Disney Princesses - Believing in Dreams. I sliced it to get just a few sun rays.
The banner is from CTMH Artiste. I sliced the letters into it.
The text is various fonts from my computer fonts files.

I mailed it to my mom the day after she got sick. She loves it and is looking forward to taking it to the beach.

I had been working on Halloween cards. Those kind of got put on hold (because of my mom but also because new Christmas craft supplies arrived lol)  But here are a couple I have done.


I carved this skeleton stamp at least 30 years ago! I love him! lol
I think he plays well with this dog from Tim Holtz' mini Crazy Dogs. (although the dog seems to be playing a bit too rough lol)

I initially was inspired by this Ken's Kreations video which is why I was stamping on craft paper.
If you have never seen Ken's videos before you need to check them out. He has great tutorials and the banter between him and Sean always makes me smile (and sometimes double over laughing)


See, this doggy does not play well with others. Or maybe he takes 'playing with others' too seriously. lol
I cut a small slit in his mouth to insert the end of the bone. (when I carved the skeleton many years ago I also carved extra bones just in case... )


This next card was also inspired by another Ken's Kreations video.
Like I said, they have great tutorials and they cheer me up (which I have needed a lot lately).

I used Distress Inks for the background: Barn Door, Spiced Marmalade, Scattered Straw and Peacock Feathers.
And of course, one of Tim Holtz' Crazy Dogs wearing a bowler hat and sunglasses from the Crazy Things set.
The dog was colored with Spectrum Noir alcohol markers.
The Happy Halloween was stamped and then embossed with white embossing powder. I had so many different stamps out for this text....some from CTMH, some Tim Holtz and some from Diamond Press. I honestly cannot remember which one I finally used (and not in the mood to dig them all out again lol ...sorry)

So, let me preface these next cards with....I have to always be learning something new otherwise I get bored. It can be just the smallest technique or a totally new craft.

Today it is a totally new craft lol


Parchment crafting.
I have seen it before. I think we might have sold the supplies at the craft store I worked at in the 80s. It was always called Pergamano whenever I saw it. Turns out that is just a brand name that has become synonymous with the craft. (like Jello or Kleenex lol)

Anna Griffin sells parchment craft supplies on HSN (of course she does!) And on her last appearance she introduced Christmas parchment supplies. Oh My Goodness! Talk about gorgeous!

What can I say, I purchased the every day and Christmas sets. It is something I can do while watching tv unlike most of my crafting where I have to be at my art desk.

The above is from the every day set. It looks so elegant yet it is so easy to do.

Here are the links for the every day set, the Christmas set and the tool set.

I attached my vellum to card stock using brads.


Here is one of the Christmas layers. It is vines with holly. So simple yet so pretty.
Oh and look! Anna has Christmas Go Press and Foil stamps!!!

I used the new wreath and Season's Greetings stamps to make this card.
I love the Go Press and Foil machine! It had a slight learning curve but once I got that all figured out I have had perfect results every time.

The wreath is foiled in gold on dark green card stock. I then foiled just the bow in red on white card stock and used foam tape to give it some dimension.
The Season's Greetings was foiled in gold directly onto the parchment.
The parchment layer was then glued down onto dark red card stock.

Do you have a Go Press and Foil machine? Having problems getting even coverage? Check out my post where I share my tips.


Here is another Christmas card using the Go Press and Foil machine and one of the new Christmas stamps. Isn't that tree gorgeous?!

The tree was foiled in gold on dark green card stock. I then hand cut the edges with decorative scissors.
The background is cream colored Cricut Pearl paper embossed with Anna Griffin's Sleigh Bells embossing folder.

Helpful tip: to ensure that thinner papers/card stocks like the pearl paper or vellum don't tear when embossing add a second layer of card stock to the folder. I used just plain Staples 110lb white card stock. Now I have a perfect pearl layer and a spare white layer to be used in another project.

I hand tied tiny red satin bows and glued them on the tree with Aleene's Tacky glue.


Last but not least...

My brother in law had a birthday last week. Of course I made him a card.

I was in the mood to try something new. 

Last May our town had their community yard sale. The automotive repair shop participated. They had sample books of leather and vinyl upholstery for free. I grabbed a few....no clue what I might do with them but couldn't just leave them there!

So, I finally came up with an idea. Could my Cuttlebug cut through thin leather and vinyl? 
Why Yes! It could!

I used an Anna Griffin oak leaf cutting die. I ran it through twice just to be sure it cut completely. They turned out great!
The background is craft paper. I inked up Anna's Acorn Scatter embossing folder with Tea Dye Distress Ink and ran it through the Cuttlebug so that the deboss was a darker brown.

The Happy Birthday is a Diamond Press die.

See what happens when I don't pop in on a regular basis? Tons of photos! lol

Here in the Pacific Northwest autumn has definitely arrived! I hope you all will get to enjoy the season very soon too.

Thank you for stopping by and Happy Crafting!


Sunday, July 02, 2017

We are officially halfway

Can you believe it is already July? I told hubby last night that I think I need to start Christmas shopping. lol

Summer is probably my least favorite season. I am not a hot weather loving person. I prefer the spring and fall temperatures. I tend to sort of shut down as the heat rises which makes the Index Card a Day challenge an actual 'challenge'.

It was a struggle to get my cards done this week. I did get them all done but I was very uninspired on a few (which you can only view on my Pinterest board)

Day 26: Green


I think I finally got around to doing this one on about the 29th. Give me just a color as a prompt and I struggle. But here we have it. Nothing but green (and 2 little red eyes). This was done with Inktense pencils.


Day 27: Farm


My first thoughts were pretty basic...a barn, a cow, a pig, maybe a chicken all standing around. How it morphed into a barnyard selfie with photo bomb I do not know lol  But I like it!

This is done entirely with Prismacolor pencils. 


Day 29: Polka Dots


Itsy Bitsy Teeny Weeny Yellow Polka Dot bikini.  In that song is the bikini yellow with polka dots or are the polka dots themselves yellow? 

This is outlined with Sharpie fine line pen and colored with alcohol markers. The sand and sky are Pan Pastels.


Day 31: Faux Wallpaper


I am not quite sure what 'faux' wallpaper is. I tried to create a vintage type wallpaper. I remember in my grandmother's houses, the wallpapers had pale colored backgrounds with something either painted or stenciled or stamped (be it flowers or geometric patterns...) and then the wallpaper had a raised, embossed texture that seemed to have nothing to do with the printed pattern. So, I used Distress Inks to create my background color. I then stenciled the swirls (this was from a Tim Holtz cutting die) and once it was dry I ran it through my Cuttlebug with Couture Creations Tied Together folder.

Have I done my card for today? Nope.  The prompt is "desert or dessert" (which I think was a prompt from last year too) Nothing has come to mind yet. Let's hope is does soon.

Until next time... I hope you all have a safe and happy Independence Day and Happy Crafting!


Sunday, June 04, 2017

Holy Cow! It's June!!!

How did an entire month slip by since my last post? Ugh!!!

Maybe because I didn't do much in May? lol
I have a hard time getting motivated in May. I really only have a couple projects I need to do....my Dad's birthday card (for the end of the month) and Father's Day cards for mid June. That leaves a lot of time where I have no ideas of what to create. (because I procrastinate and don't make those cards until the last minute lol)

Here is my Dad's birthday card.


It is the Hamburger Box card from SVG Cuts, the Sunday with Dad set. I think it is such a cute card and really easy to make.
Dad liked it too.

And I have his Father's Day card ready to mail (but not the cards for hubby or my father in law lol)


This is the Tackle Box box card. Isn't this just the coolest card! It is also from the Sunday with Dad set from SVG Cuts. 

I have to say, although it is easy to assemble, it took me all afternoon! (all those tiny pieces for all that tackle) I hope he likes it.


In case you missed it, there was an all day craft day on HSN in May.
I really need to stop recording those to watch after work. I know the couple things I want and order them at the beginning of craft day but then I watch all the recordings and see other things.....very bad (and expensive lol)


This is from a Crafter's Companion die cutting set. It is a flip card. Yeah, I have flip card dies already from Anna Griffin and I have a flip card cartridge. But they all have differences. And when you make as many cards as I do you enjoy having lots of options.

This is the front of my card. The hello in a circle was created in Cricut Design Space (see, my toys play nicely together)  The decorative panels are cutting dies from the Crafter's Companion set. I ran them through the Cuttlebug using a wood grain folder.

This set actually comes with lots of extras to make really intricate cuts in your cards. Sarah calls them 'kinetic' cards because they have movement.

You can see the entire set here.


The center circle 'flips' to reveal this little guy. I picked him up at Treasure box designs a couple weeks ago. He is part of their Stuffy Pals line and currently on sale. I changed up the colors a bit from what they show but he is the raccoon file.


Here is close up. Isn't he a cutie? His circle background was embossed with Darice's Flower Frenzy embossing folder.

And lastly...


It's ICAD season!!!!!

Yep the Index Card a Day challenge began on June 1st! This is my third year participating.
I will be showing some of my cards throughout the next couple months but not all of them.
If you want to see them all they will be posted on my Pinterest board.


Each year I make a matchbox style box to hold my cards. Here is my 2017 box. I cut the box pieces and the letters ICAD with my Cricut Explore. The numbers are from Anna Griffin's  Wishful Thinking die set. The page frame and pointing hand are from her Perfect Planner die set. 


Prompt #1: Sunrise

I used Gellatos to create my sunrise. 


Prompt #3: Vintage

The frame was cut using a cut & emboss die from Darice. I then rubbed Tea Dye and Walnut Distress Inks around the edges. The happy couple is from Tim Holtz new Paper Dolls set of die cuts. There are so many great images in that set. I had a hard time deciding who to use. The background was embossed using Anna Griffin's Cuttlebug folder Empire Arches. I then rubbed Distress Oxide Worn Lipstick all over to bring out the texture.


It looks like summer has finally arrived. I hope you all find lots of time to enjoy the sun and find lots of inspiration.

Happy Crafting!!!

Friday, May 12, 2017

Go Press and Foil Machine revisited

Back in March I wrote a review for the Couture Creations Go Press and Foil Machine. If you missed it you can check it out here.

For the most part, I liked the machine but I had some issues that were bugging me.
Mostly, the inability to get full, even foiling on the large frame stamp die.

Well, I was a bit obsessed with giraffes for a couple months (so was the rest of the world so don't judge me lol) but I went back to this machine this week.

I found a video on YouTube that really opened my eyes. It is from Scrapbooking Made Simple. You should check it out. https://m.youtube.com/watch?v=sVWZ5BBe1i8

For me, since I already knew what this machine was 'supposed' to do, I was looking for some sort of tip on how to get even foiling. She says several times....there is hardly any pressure, you almost think there is no pressure it is so light. That was a light bulb statement for me.

I use my Cuttlebug all the time and I am sure you do too (or your Big Shot or whatever crank type embossing machines are out there) and we all know you need pressure to get a good cut or deep emboss.

We, that is one of the big secrets to this machine.....next to no pressure. You really think surely it needs more pressure. But in reality you should barely feel any resistance.

So, no pressure and longer heating time. Those are my tips for you today!

Here is my first attempt at the frame from a couple months ago.


See how the foil is sparse? That bugged me. Shouldn't a foil machine, when using their dies and their foil and their directions, give you even foiling? I thought so.

Here is my frame from yesterday.


It is Perfect!
What did I do?
I laid the stamping die on the machine, closed the lid and let it heat up for about a minute.
I then laid the foil, background card stock and a shim (a piece of 110 lb white card stock from Staples folded in half) over all of it and closed the lid.
Then I waited. Well actually, I took some pictures of other projects, went and filled my water bottle, talked to Minnie...  I waited probably 5 minutes.
Everything was evenly heated when I ran it through my Cuttlebug.
I rolled it through very, VERY slowly....3 times.
I then removed my foiled cardstock and let it cool completely before removing the foil (this only takes a few seconds)

I was so happy I ran and showed Minnie. She was not impressed....she is a cat after all! lol (Tucker was always impressed but he was much smarter...sorry Minnie lol)


I wanted to be sure this wasn't a fluke so I grabbed the rose die. It's the third stamping die that came with my kit from HSN. I hadn't tried it yet because I didn't want to be disappointed with that one too.


The photo is dark so that the foiling shows up. Look at that! Even coverage! There is a stray bit of foil near the top but that was because I didn't trim my foil small enough...easily corrected.


The pink worked beautifully too!

I used the exact same steps as the frame. I don't think you can really over heat the dies and paper. The machine shuts off after 20 minutes or so if you forget about it. My theory is that if the heat has penetrated all the layers on the machine it works better. Less heat loss moving it to your embossing machine and actually rolling it back and forth.

So I had to retry using cutting dies. Remember, before they were cutting through my card stock as well as foiling. (there is that pressure issue again)


Not any more. I used the same 'sandwich' as on the frame. The cutting dies are thinner than the stamping dies so I really thought there was not enough pressure. I couldn't feel any resistance at all!

But I got perfect foiling with just a slight indentation in the card stock. Yay!

So, what do you do with just an outline of a butterfly?


I pressed mine into some wet Distress Inks. My intention was to then cut it out and ink the edges darker but I like the swirls of ink around the edges so I am going to hold off and think about it for a while. It could make a very nice card front as is....just add a sentiment and there you go. 

And then I thought....it is supposed to foil chipboard pieces. I don't have any (well that's not entirely true....I have some I'm just not sure where lol) but what about foiling die cuts? If I increase the thickness of the shims to mimic the thickness of chipboard...


I could not get a decent picture of either of these but you can see it is blotchy on the 'Father's Day" and you can see the blue card stock showing on the Hello.

I am thinking thicker shims, just a little thicker. Maybe a piece of cereal box....I'll work on it.

But these are not a total loss.


The foil resists inks. I grabbed my Distress Black Soot and rubbed all over the Father's Day. I then rubbed it with a tissue to remove the excess ink. It now looks like distressed metal. The picture doesn't do it justice. It is pretty cool!

And I rubbed Distress Tea Dyed on the Hello. It is very close in color and that one now looks like aged metal. Again, very cool.

The potential with this machine has increased for me. (and I thought it had potential before)

I hope, if you have been struggling with your Go Press and Foil Machine, that this helps you out. 

Once I work out how to get die cuts evenly foiled I will let you know....imagine being able to foil ANY die cut shape (even Cricut shapes) without them having to be cut from toner paper and run through the Minc (which I still love and use)

Happy Crafting and Happy Mother's Day this Sunday!


Oh, and I am still obsessed with giraffes!


Don't tell anybody but this is from one of the BadBaby round robin journals. We aren't supposed to share any pictures until after the swap ends but I couldn't resist (and how can you be a BadBaby if you don't break any rules?)

It was so hard to resist tearing out the pages and keeping this. :-(


Sunday, April 09, 2017

Happy Anniversary!

Hubby and I just celebrated our 15th anniversary. We always take a few days and head to the coast. It is a nice way to relax and so nice to get away but it also keeps me from creating much lol

I did manage to get my Mother's Day cards done before we left.


My camera is having issues. Every picture has a yellow cast. I keep messing with the settings and it makes no difference. This card is actually blue (not aqua lol) and the interior layer is white.

The fancy lace edge is a cutting die from Crafter's Companion called Sophia. Isn't it gorgeous?!  It was another one of those March 8 craft day purchases. I told you I bought WAY MORE than I usually do! lol

The lace corner comes from the Vintage Wedding Cricut image set. I have no idea if that is a cartridge or just a set in Design Space as I had never heard of it before. The actual image is a round lace doily that I sliced down to just a corner piece.

The flowers are also from Cricut and is called 3D Cactus Flower.

"Happy Mother's Day" was cut with my Cuttlebug. "Happy" came from the Crafter's Companion die set call 'Let's Party'. I liked the smaller size. This set is actually designed to go with the Diamond Press cut/emboss machine but the dies work great in the Cuttlebug too.
"Mother's Day" comes from Anna's 'Wishful Thinking' set.  It also has a 'happy' die but it is much larger and took up too much space. I love how all these word dies from CC and AG can be mixed together!


This card just kept growing lol

I started with Anna's Flower Bramble cutting die in pink on top of the cream card base.

I then cut the image for the sentiment (and it's dark pink layer) from the Fantastic Flips Cricut cartridge. I stamped the sentiment using Anna Griffin's flip card stamp sentiments set.

I needed more so I used Print Then Cut on the Cricut Explore and cut the roses which are on the Fantastic Flips extra content cartridge.

I needed even more so I added the lavender layer under the Flower Bramble. 
Ugh! I felt it still needed MORE lol  So I dug through the cutting die drawer (yes, I have a drawer and it is over flowing - even after moving a ton of dies into magnetic storage binders lol) 
I cut the cream, rounded edge lace using a die from the Eleanor Laces set.

You know I don't normally have this many layers on a card but I think I was channeling Anna Griffin lol

I like how it turned out so I guess Anna didn't steer me wrong. :-)

And lastly...


Hubby's niece announced this week that she is engaged. I thought that deserved a card. :-)

The fancy edge is from Anna Griffin's edge die set. These dies cut so beautifully!
I then added a cream strip topped with a vellum embossed layer using the border from the Bit of Paisley embossing folder set.
The roses and sentiment were embellishments from one of the AG flip card sets.


Here is a close-up of the embossed vellum. It looks a lot like lace when you emboss it.

Helpful tip: put a piece of card stock under the vellum in the embossing folder. It keeps the vellum from tearing AND you also get an embossed layer to use in a later project.


Here is a picture from our anniversary trip. It was close to sunset on a cloudy day. This is the Coquille River lighthouse in Bandon, Oregon. 
It no longer contains a light but is still a beautiful building. It is often open for tours and you can climb up into the light tower.

I hope you all have a beautiful week and lots of crafting time!

Happy Crafting!!!