I like Valentine's Day or maybe I should say I like any day that makes someone buy me chocolate lol
I used to decorate for Valentine's Day and put up lots of hearts and doilies. But not any more. I am getting old and lazy lol. But I still make cards....or try too. I am way off track this year and just finished my parent's card today. And since it is Sunday, I can't mail it until tomorrow which means they probably will not get it until the 15th. Oh well, can we really only tell people we love them on the 14th?
I made a shaker card! I used Anna Griffin's shaker card dies. And Cuttlebug's confetti dies for the 'filling'.
The patterned card stock came from a new Recollections paper pad called Girlsquad. It has lots of cute Valentine papers.
I struggled with this one. Not in the making but in the 'do I really like this?' stage. The die set is really nice as it gives you dies to cut the window in your card base, the window in your card front and lots of embellishments. But I just wasn't feeling it until I got all the embellishment in place. I think the rose finally did it for me. That came from some freebie I got with an Anna Griffin order lol And it had all kinds of swirls and stuff with it that I had to cut off. But I think it was worth it. I hope my parents like it.
In my last post I said I had just received my Dina Wakely Media journal. The 8x10 version came out last year (at least I think it was just last year and not earlier than that). What is cool and different about it is that it has 4 different substraights in it.....watercolor paper, canvas, kraft paper and burlap....all in one journal!
She brought out a larger version this year at Creativation but there is no way I would have space for it or comfortably be able to fill such a large work space. (I tend to work small so the 8x10 is already going to push me outside my comfort zone)
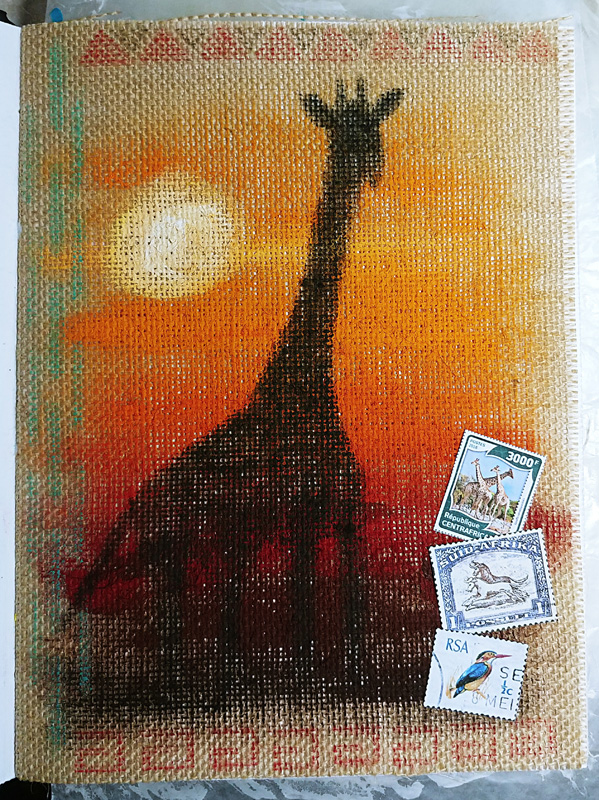
I jumped right in with burlap! I have never worked on burlap before. I tend to avoid it at all costs due to the smell and that fact that something in it (maybe all those fibers) makes me sneeze. So, with tissues at the ready, I dove right in. I used acrylic paints in reds, oranges and yellows to create a sunset background with white and pale yellow for the sun.
I then used Dina's Scribble Sticks in black to draw a giraffe. It is tough to get a straight line on burlap! So I have a stylized giraffe lol
I then used Scribble Sticks for the patterns around the sides but it still needed something.
I googled African postage stamps and found some I liked. I printed them on regular printer paper so they would feel more like the real thing. I cut them out and glued them down with Aleene's Tacky Glue.
So now I need to decide my next step. I am thinking of washing a medium to dark color over the stamps, or at least part of them, to help settle them into the background a bit. But it is a work in progress so I will mull it over for a bit.
Here is a page on the watercolor paper. I watched one of Dina Wakely's YouTube videos on drawing faces. Faces are not my forte. If I spend long enough on them (like hours and hours drawing) they turn out fairly well. This was a fun way to create a face in a short amount of time.
I tend to be very rigid in my drawing and painting. I see people all the time that freely slap paint on canvas without any obvious direction and they just let the colors and forms guide them. I have never been one of those people. I have to see it all in my mind before I can even start. I want to see if I can be more loose and free in this journal. I don't think there is anything wrong with my creative style...it's worked for me for over 50 years....but there are days lately where I desperately want to create something but don't have the time to think it all out in advance. I want to be able to open to a page and just brush on some color and then be able to walk away and come back later and apply something else...no pre-planned ideas.
Wish me luck! lol
So that is all I have for this week. I still need to make a Valentine for hubby (not much time left for that one!). And my brother has a birthday next week so I need to get that done as well. My bullet journal did not keep me on track this week! lol
If your weather is even remotely like mine....stay warm! And Happy Crafting!
Fall is my favorite time of year. The cooler temperatures, blue skies, colored leaves, apples and PUMPKINS!
Yesterday we headed out to the farm and bought our first pumpkins of the season! :-)
I'm sorry I haven't been here for a few weeks. My mom got sick. My parents live on the opposite side of the country so all I can do is worry, pray and spend a lot of time on the phone checking up on her. It puts a damper on my crafting spirit and decreases my crafting time....but that's ok. My primary goal right now it to get my mommy well.
But, I do have some things I made before she got sick AND a few things I have been working on the past few days. (the better she feels the more my creativity comes back) :-)
This first item I actually made a couple months ago. I just finally got around to downloading it off my camera lol
In July I started participating in virtual races because my sister wanted me to do the RockNRoll 5k in Las Vegas in November and I am totally out of shape. She convinced me to start doing virtual races to get into walking. Well, I am now not going to go to Las Vegas....saving up for a much bigger trip. But I am still doing the virtual races. It turns out that if you dangle pretty things in front of me I will actually get off my butt and exercise! lol
I have completed 7 races and am almost done with the 8th ranging in distances from 5k to 40 miles. And I have a collection of really cool medals to show for my efforts! (I will get some pictures of those for a later post)
Needing a place to display my hardware, I created this board. I used my Cricut Explore to cut vinyl to use as stencils. I added cup hooks across the bottom to hand my medals.
I'm not sure if I've mentioned this before but my mom loves tote bags. I mean she really LOVES them. She has tons of them! lol I have made or bought her several over the years.
When I got my Easy Press I knew I needed to make her another one.
The bag itself came from Walmart. It is one of their shopping bags. They are usually on a rack near the door and cost $4.00. They are fairly large, have a magnet closure at the top and are made of a medium weight canvas. I don't know that I could make it for less then $4.00.
I used both glitter and lite Cricut heat transfer vinyl.
The pelican/beach, turtle and crab are from the Life is a Beach cartridge.
The sun is from Disney Princesses - Believing in Dreams. I sliced it to get just a few sun rays.
The banner is from CTMH Artiste. I sliced the letters into it.
The text is various fonts from my computer fonts files.
I mailed it to my mom the day after she got sick. She loves it and is looking forward to taking it to the beach.
I had been working on Halloween cards. Those kind of got put on hold (because of my mom but also because new Christmas craft supplies arrived lol) But here are a couple I have done.
I carved this skeleton stamp at least 30 years ago! I love him! lol
I think he plays well with this dog from Tim Holtz' mini Crazy Dogs. (although the dog seems to be playing a bit too rough lol)
I initially was inspired by this Ken's Kreations video which is why I was stamping on craft paper.
If you have never seen Ken's videos before you need to check them out. He has great tutorials and the banter between him and Sean always makes me smile (and sometimes double over laughing)
See, this doggy does not play well with others. Or maybe he takes 'playing with others' too seriously. lol
I cut a small slit in his mouth to insert the end of the bone. (when I carved the skeleton many years ago I also carved extra bones just in case... )
This next card was also inspired by another Ken's Kreations video.
Like I said, they have great tutorials and they cheer me up (which I have needed a lot lately).
I used Distress Inks for the background: Barn Door, Spiced Marmalade, Scattered Straw and Peacock Feathers.
And of course, one of Tim Holtz' Crazy Dogs wearing a bowler hat and sunglasses from the Crazy Things set.
The dog was colored with Spectrum Noir alcohol markers.
The Happy Halloween was stamped and then embossed with white embossing powder. I had so many different stamps out for this text....some from CTMH, some Tim Holtz and some from Diamond Press. I honestly cannot remember which one I finally used (and not in the mood to dig them all out again lol ...sorry)
So, let me preface these next cards with....I have to always be learning something new otherwise I get bored. It can be just the smallest technique or a totally new craft.
Today it is a totally new craft lol
Parchment crafting.
I have seen it before. I think we might have sold the supplies at the craft store I worked at in the 80s. It was always called Pergamano whenever I saw it. Turns out that is just a brand name that has become synonymous with the craft. (like Jello or Kleenex lol)
Anna Griffin sells parchment craft supplies on HSN (of course she does!) And on her last appearance she introduced Christmas parchment supplies. Oh My Goodness! Talk about gorgeous!
What can I say, I purchased the every day and Christmas sets. It is something I can do while watching tv unlike most of my crafting where I have to be at my art desk.
The above is from the every day set. It looks so elegant yet it is so easy to do.
Here are the links for the every day set, the Christmas set and the tool set.
I attached my vellum to card stock using brads.
Here is one of the Christmas layers. It is vines with holly. So simple yet so pretty.
Oh and look! Anna has Christmas Go Press and Foil stamps!!!
I used the new wreath and Season's Greetings stamps to make this card.
I love the Go Press and Foil machine! It had a slight learning curve but once I got that all figured out I have had perfect results every time.
The wreath is foiled in gold on dark green card stock. I then foiled just the bow in red on white card stock and used foam tape to give it some dimension.
The Season's Greetings was foiled in gold directly onto the parchment.
The parchment layer was then glued down onto dark red card stock.
Do you have a Go Press and Foil machine? Having problems getting even coverage? Check out my post where I share my tips.
Here is another Christmas card using the Go Press and Foil machine and one of the new Christmas stamps. Isn't that tree gorgeous?!
The tree was foiled in gold on dark green card stock. I then hand cut the edges with decorative scissors.
The background is cream colored Cricut Pearl paper embossed with Anna Griffin's Sleigh Bells embossing folder.
Helpful tip: to ensure that thinner papers/card stocks like the pearl paper or vellum don't tear when embossing add a second layer of card stock to the folder. I used just plain Staples 110lb white card stock. Now I have a perfect pearl layer and a spare white layer to be used in another project.
I hand tied tiny red satin bows and glued them on the tree with Aleene's Tacky glue.
Last but not least...
My brother in law had a birthday last week. Of course I made him a card.
I was in the mood to try something new.
Last May our town had their community yard sale. The automotive repair shop participated. They had sample books of leather and vinyl upholstery for free. I grabbed a few....no clue what I might do with them but couldn't just leave them there!
So, I finally came up with an idea. Could my Cuttlebug cut through thin leather and vinyl?
Why Yes! It could!
I used an Anna Griffin oak leaf cutting die. I ran it through twice just to be sure it cut completely. They turned out great!
The background is craft paper. I inked up Anna's Acorn Scatter embossing folder with Tea Dye Distress Ink and ran it through the Cuttlebug so that the deboss was a darker brown.
The Happy Birthday is a Diamond Press die.
See what happens when I don't pop in on a regular basis? Tons of photos! lol
Here in the Pacific Northwest autumn has definitely arrived! I hope you all will get to enjoy the season very soon too.
Thank you for stopping by and Happy Crafting!
HSN all day craft days always cost me a fortune!!! Their July day was no exception. I ended up with lots of really cool stuff (which you will most likely see in later posts) and one thing I never even considered.
Anna Griffin gives sneak peeks of all her products every week on her blog. You know long before air time exactly what she is selling. She previewed her printer the week before the big day. I looked and thought....Nope, no need for a printer....and moved on with my life.
On craft day, the printer was the daily special. The introductory showing was the opening segment at 12 am (EST). I'm on the west coast so, 9 pm. I stayed up and watched. Uh Oh!
Hubby watched too, he NEVER does that. He started with....you DO NOT need a printer! And we watched as Anna printed on vinyl, and canvas, and magnet sheets...so what? I don't need to print on those things. And then she did it, she paired it with her Cricut Explore and printed up images, using Print Then Cut, on card stock. Normal, plain white card stock. And the images were Bright and Vibrant!
When I print on card stock using my Brother MFC-JW70DW the colors are dull and muddy. Don't get me wrong. It is a great printer! Images and text are crisp, the ink lasts 'forever'. Color prints on photo paper? Gorgeous. Color prints on paper or card stock....bleh.
The hubs and I were stunned. Was it just the lighting? Was she not really using regular card stock? They showed the printed material from several different angles. It looked fabulous. I looked a hubby, he looked at me. The host said....over 2000 of these are already gone. This is going to sell out in just a few hours. Hubby said, You better go buy it now. It will be gone when you wake up.
So I did! :-)
Am I happy I took the plunge? You bet!
Here it is sitting beside my Cricut Explore Air 2 Anna Griffin edition. It is almost a perfect match. (the Explore is ivory and gold, the printer is white and gold) I am not someone who needs their stuff to match but they do look nice together.
In this picture the back of the printer is actually on the left. I now currently use it with the back facing me since the back slot is where you feed the special materials and heavier card stock.
Since my only issue with my other printer is color on card stock that is what I tested first. If that didn't impress me then back it would go.
The top birds were printed on the Brother, the bottom on the Kodak.
The difference is noticeable in the photo. In person it jumps out at you!
This is Staples 110 lb white card stock and it now looks amazing.
The printer is compatible with your computer and can connect via wifi (you can hard wire it into your computer too with the USB cord that comes with it).
There is also a Kodak app so that you can print photos directly from your phone or tablet (or so they claim)
Any special materials must be set up via the app which some people are not happy about but that doesn't bother me. What did bother me is that they advertised that you can use Apple or Android apps...which technically is true but you cannot alter the Anna Griffin content unless you use an iPad (at this time)
When buying the printer from HSN, it comes with an Anna Griffin package of pre-designed cards.
If using an iPad, you can change the text on the cards to suit your needs. Once I figured out I had to use my iPad not my Kindle Fire it was very easy to create a card.
I was able to change the text to thank hubby for setting up my printer. He liked the thought but wasn't thrilled with the feminine card lol
The app walks you through step by step showing you which direction to load the folded card base....yes, already folded card base....how to turn it to print the front or back and then how to get the inside printed if you want (you cannot edit the text for the inside - but if you have a Cricut Explore, have it write your message and cut your card base then do the outside printing)
Anna gave us greeting cards like above, ten different ones, ten photo cards which are fancy frames that you can center your own photo within and print, and ten thank you cards. I usually want to make my cards from scratch but if you are in a hurry this is a great alternative and they look very pretty.
This is my crazy girl Minnie on a photo card. Such a silly girl.
From the app you can print photos and envelopes, scan things, copy stuff and print directly from social media.
I haven't done all those things yet but have tried printing photos. You choose your photo from your device, pick your print size ranging from 4x6 up to Executive (not exactly sure how big that is) you also have a Legal option and borderless options for 4x6 and 5x7.
When I tried just 5x7 and loaded a 5x7 piece of card stock here is what I got.
As you can see, it did not print 5x7, it didn't even print in the center of the card stock.
I tried several sizes and every time it would print up in the corner and smaller than the chosen size.
I found a way to remedy this. I send my picture to my computer, size it in Photoshop to 5x7 or whatever size I want then send it back to my device then use the app to print. Now it is already the size I want and prints correctly.
On the below picture, since I was already in Photoshop, I added a border to match the yellow on the typewriter. Photo and border combined were 5x7.
Now it prints centered (more or less). I still haven't figured out why it won't just print the correct size right from my iPad but I will keep working on it.
You also have the option in the app to "Print Your Own Design". This is the area that allows you to chose custom materials.
You choose your material size and type. You can choose paper, card stock, fabric, leather, canvas, cork, iron-on, magnet sheet, printable vinyl, sticker paper or tattoo paper. Pretty cool right?
I have tried the magnet sheet. (samples of magnet, canvas and printable vinyl came with the printer in the Anna Griffin bundle)
It printed beautifully. It feeds through the back slot so that it never bends or rolls the material.
I haven't tried the canvas or vinyl yet. I can't see myself actually printing on these extra materials that often but it's nice to have the ability to do so if the urge arises.
But, when you say craft printer and tell me it will print on lots of things besides paper/card stock of course I have to try something off the wall.
This is Tucker (still miss him!). I used the plastic from a Cricut cartridge package. It is a fairly firm acetate. It ran through perfectly and did not smear the ink (that part surprised me)
It laid down a fairly heavy layer of ink. So heavy that 2 days later it was still damp lol
So I blotted it on a blank sheet of copy paper.
The blot dried immediately, the acetate took a few hours to dry.
Both are legible prints and usable in a project.
I am going to have to see if there is something like a "fast print" or "ink saver" mode and try again. But overall, I was impressed that it printed without smearing.
Then someone asked me, is the ink waterproof?
Only one way to tell. This image is one from Anna Griffin. The app has several inspirational quotes you can print up and add to projects.
This is printed on Staples 110 lb white card stock.
When I just ran it under water nothing happened. So then I rubbed my fingers over the ink and tried to smear it. Again nothing. So I let the water thoroughly saturate the paper and let it sit. As you can see the ink did finally begin to bleed, but only the tan not the green.
My impression is, if you accidentally get something wet, if you were to wipe off the water right away, I don't think it would bleed.
My overall final thoughts?
I bought it for printing on card stock for the Cricut Print Then Cut feature and for collage projects.
Does it do what I expected? Defintely! The prints are clear and vibrant. It works beautifully with my Cricut (without even calibrating - I have the original Explore {as well as the Air 2} and you have to calibrate your printer- usually)
Do I think the ability to print other material types is good? Yes, you never know when you might want to print on something odd....like an old Cricut package lol Although that was not the primary reason I bought it.
Do I think the app works well? Yes and No. It is fun to print right off your phone but the fact that things will not center on the material is annoying.
I know how to work around that but it takes more steps than they imply...or maybe there is something I still need to figure out (but others online are having similar issues so...)
And I can always print on a larger sheet and then just cut it out but that kind of defeats the purpose too. More to come on this issue.
Would I recommend this printer? Yes. If you can get it with the Anna Griffin extra content.
Being able to quickly print beautiful cards and having the option of adding beautiful frames to photos is really nice.
Being able to print on cool things like magnet and canvas is fun.
If all you want or think you will ever need is to print on paper or card stock then no, you can probably find something else that will do that just as well and cost a bit less.
Overall I am happy. There is always a learning curve with any new product and I am sure I will work out the centering issue.
The quality is fabulous and I look forward to printing a lot more projects.
Here is the card I made using those test birds. The embossing folder and die cuts of the cage and branches come from Anna Griffin's Birdcages and Branches set (also from HSN on the July craft day)
I did some more Print Then Cut using Anna's latest cartridge...Her digital library vol. 1. (I told you that day really grabbed me lol)
Aren't these just the coolest????? This picture isn't even that great and kind of dark and yet they are still vibrant!
Here they are on a card.
The card base is from Anna's window box card set (not bought on the July craft day lol). I used the cutting dies included in the set.
The girl is from the new Gorjuss Girls set from that day on HSN (yeah I know lol)
And the Hello border strip is a Diamond Press cutting die.
Don't those shells and crab look great with the little girl listening to a sea shell?
That covers all my thoughts and tests so far. I hope some of the information was helpful to you.
I will share new info and tests as I get them done.
Until then, Happy Crafting!
Hubby and I just celebrated our 15th anniversary. We always take a few days and head to the coast. It is a nice way to relax and so nice to get away but it also keeps me from creating much lol
I did manage to get my Mother's Day cards done before we left.
My camera is having issues. Every picture has a yellow cast. I keep messing with the settings and it makes no difference. This card is actually blue (not aqua lol) and the interior layer is white.
The fancy lace edge is a cutting die from Crafter's Companion called Sophia. Isn't it gorgeous?! It was another one of those March 8 craft day purchases. I told you I bought WAY MORE than I usually do! lol
The lace corner comes from the Vintage Wedding Cricut image set. I have no idea if that is a cartridge or just a set in Design Space as I had never heard of it before. The actual image is a round lace doily that I sliced down to just a corner piece.
The flowers are also from Cricut and is called 3D Cactus Flower.
"Happy Mother's Day" was cut with my Cuttlebug. "Happy" came from the Crafter's Companion die set call 'Let's Party'. I liked the smaller size. This set is actually designed to go with the Diamond Press cut/emboss machine but the dies work great in the Cuttlebug too.
"Mother's Day" comes from Anna's 'Wishful Thinking' set. It also has a 'happy' die but it is much larger and took up too much space. I love how all these word dies from CC and AG can be mixed together!
This card just kept growing lol
I started with Anna's Flower Bramble cutting die in pink on top of the cream card base.
I then cut the image for the sentiment (and it's dark pink layer) from the Fantastic Flips Cricut cartridge. I stamped the sentiment using Anna Griffin's flip card stamp sentiments set.
I needed more so I used Print Then Cut on the Cricut Explore and cut the roses which are on the Fantastic Flips extra content cartridge.
I needed even more so I added the lavender layer under the Flower Bramble.
Ugh! I felt it still needed MORE lol So I dug through the cutting die drawer (yes, I have a drawer and it is over flowing - even after moving a ton of dies into magnetic storage binders lol)
I cut the cream, rounded edge lace using a die from the Eleanor Laces set.
You know I don't normally have this many layers on a card but I think I was channeling Anna Griffin lol
I like how it turned out so I guess Anna didn't steer me wrong. :-)
And lastly...
Hubby's niece announced this week that she is engaged. I thought that deserved a card. :-)
The fancy edge is from Anna Griffin's edge die set. These dies cut so beautifully!
I then added a cream strip topped with a vellum embossed layer using the border from the Bit of Paisley embossing folder set.
The roses and sentiment were embellishments from one of the AG flip card sets.
Here is a close-up of the embossed vellum. It looks a lot like lace when you emboss it.
Helpful tip: put a piece of card stock under the vellum in the embossing folder. It keeps the vellum from tearing AND you also get an embossed layer to use in a later project.
Here is a picture from our anniversary trip. It was close to sunset on a cloudy day. This is the Coquille River lighthouse in Bandon, Oregon.
It no longer contains a light but is still a beautiful building. It is often open for tours and you can climb up into the light tower.
I hope you all have a beautiful week and lots of crafting time!
Happy Crafting!!!
I have never done a product review before, although I have no problem telling people what I think of various products....especially art/craft products. lol
I received my Couture Creations GoPress and Foil machine yesterday and after much searching online the only information I could find was from Couture Creations. This product is REALLY new to the market so I thought I would share my first impressions.
Let me start with this, I purchased the Anna Griffin version from HSN on the March 8th all day craft day. (I told you in my last post that everything had not arrived yet lol)
It came with the machine itself, a heat proof silicone mat, the pick n' lift 3 in 1 magic tool (super cool tweezers) and 5 sample rolls of foil.
According to all the sites I saw, the normal version only comes with silver and gold foil samples.
Also, because it was Anna Griffin and an HSN deal, mine came with 3 hot foil stamps as well.
These are all Anna Griffin labeled metal stamps. A vintage rose, Happy Birthday and a frame. I ordered the additional stamps as well but they are still on back order.
So what makes this machine different from my Minc machine (which I still love BTW)?
For this machine you do not need printer toner images. It uses heat activated foil so you heat up the metal foil stamps then lay the foil and paper (or whatever you want the foil image on) on top and then run the whole thing through your Cuttlebug or other similar embossing machine.
You can watch the Couture Creations video here.
I wanted to share with you a few of the things I have tried.
I started with the basic hot foil stamp on card stock.
I used the Happy Birthday stamp and pink foil.
My first impression? It applied the image beautifully! The pink and blue foils are not as shiny as I expected (Minc foil is super shiny) but it has a very nice sheen. I am really pleased with how this turned out.
I then tried the frame stamp.
Again the silver is not super shiny but does have enough sheen to be reflective and is a nice effect.
I encountered a couple issues while using the frame.
Because you lay down the stamp first to heat it up and then lay down the foil and lastly the card stock it is difficult to line it all up and get it centered on the card stock. So far that has meant cutting the card stock a lot larger than needed and cutting it down after foiling. This leads to wasted card stock so I need to figure out a way to line stuff up.
I also found that, on this image, I did not get even pressure so the foil was not applied evenly.
As you can see, in the center of the image (on both ends even though that is not visible on the top image due to reflection) the foil is not even.
I'm not sure why. I had large shims that covered the entire plate, I don't have the problem when embossing with my Cuttlebug so I don't think that is the issue. I cannot see any visible 'dip' in the center of GoPress surface so I will need to just watch and see how often this happens.
My next experiment was with an embossing folder. Now this was something that really sold me on this machine. I have hundreds of embossing folders and to be able to use them in a new way is exciting.
You lay down a metal shim on the heat plate (I have one from Cottage Cutz called a Universal Shim plate and cost around $10)
You then put down your foil, then your card stock and finally your embossing folder (opened up and the 'bumpy' side down against the card stock). You top this with your Cuttlebug B plate and run it through your Cuttlebug.
It is a very interesting effect. But again, the center did not get even coverage. The center if fairly light yet the edges are much darker. It is a background so most of the center will be covered with something else but still...
Again, I am not sure if it is a defect in the GoPress or something with my Cuttlebug. I will need to play around more. Possibly see about using a thin rubber shim under the B Plate to help with pressure.
So, moving right along, thin metal cutting dies. I have TONS of them! How about you?
They work in this machine as well.....just like the foil stamps! Or so they say.
This is a rose cutting die from Anna Griffin. I think it was in one of her seasonal die sets from last year.
If you watch the videos from Couture Creations they say you can use these just like the hot foil stamps but they will add foil and not cut.
Well.....it definitely added foil but it also cut. It cut clean through the outer edge of the entire die. It cut partially through the inner pieces. Is this a bad thing? No, it actually is really cool! But not exactly what I was expecting. I think by reducing the shim thickness when running through the Cuttlebug I should be able to stop this from happening. But then again. I like that I have this really cool rose foiled die cut to play with now. :-)
And lastly, leather....yep Leather!
Online they say it can foil leather. The examples I saw were faux leather textured paper/card stock. You tell me leather I think LEATHER!
I have a bag of leather tags (and other scraps) I picked them up for a song at an estate sale years ago thinking that some day I would find a use for them. It is really high quality stuff. I have used a few over the years. They all have paper labels on the back from some upholstery place. Very cool.
So, I grabbed a butterfly die (probably not my best choice) and ran it through the machine. Voila! foil on leather. And this stuff does not scratch or scrape off!!!
Now here is my issue (and I think it has to do with the fact that these tags are super soft leather and a little over 1/16" thick) the foil applied to areas I didn't want.
Can you see it deeply embossed into the leather (which is so cool!) but at the top around the antennae it applied foil everywhere. I think because the entire die got pressed into the soft leather.
I tried cutting the foil down so it conformed more to the shape of the die.
It was better but still has issues. Due to the problem I listed earlier about not being able to see to line things up exactly, I can't cut the foil down much more. So I think if I want to foil more leather tags (and I think I do lol) I will need to stick to dies that do not have indented areas like this one so I can cut the foil down much closer to the actual shape.
So, would I recommend the GoPress and Foil machine?
Yes!
Do I think it has a learning curve? Sort of. I think it will take a few tries to get the shim pressure correct. But even my 'mistakes' are still usable (well maybe not those butterflies until I can figure out how to scrape off some of that excess foil lol)
This is a small, lightweight machine which makes it easy to move around and store.
It works with their hot foil stamps and my embossing folders and cutting dies which gives me hundreds! of images and patterns that can be foiled onto different media.
They say it even works with my Minc foil so I will have to test that out as well.
I think this machine is a great addition to my craft room. It is another way to add that little extra umpf to my projects and I am looking forward to experimenting with it even more.
UPDATE:
Last night while hubby was talking with a guy about putting a new roof on our house I was playing (hiding) in the craft room.
I really wanted to see if I could remove the excess foil from the leather tags.
I tried using a stiff stenciling brush which did take off a bit of the shine but didn't really make a dent in the foil.
I then wondered if an eraser would work. No! Not my brightest idea but I had to try. lol
I then thought, I just want to scrape this stuff off.....bingo! I grabbed a craft knife and lightly scraped the surface. Ha! The foil began to disappear. I have no idea where it went because it wasn't on the knife or my desk but I don't care. It is no longer on my tags.
Was I able to remove every bit? No. Did I remove enough that you don't notice it any more. Yes!
I think these are really cool and would be great attached to luggage or dangling from the strap of your purse. I am seeing more leather foiled tags in my future.
Thanks for stopping by and Happy Crafting!
Update: May 12, 2017
I have written a new blog post about the Go Press and Foil Machine with some helpful tips to get even foiling.
You can read it here.
Thanks for stopping by!