Friday, June 11, 2010

Just playing around

Helen told me I needed to do a 3D zentangle. I thought about it and didn't really want to 'buy' something to alter...what if I messed it up? LOL

Then I thought....bowling pin! Doesn't everyone have a set of old, used bowling pins in their garage??? I picked them up at the local alley a few years back. Cost me around $5 I think. Figured I would find a use for them...eventually. :-)

So, here is a video of my tangled pin. It would have been sooooo much easier if I owned a lazy susan. But I don't. Instead I stumbled around out in the yard LOL If the video sort of makes you dizzy just imagine how I felt?! LOL

I also wanted to try out my new flip video camera. This video doesn't do the camera or the pin justice...but you will get the idea LOL

And now the dilemma....what to do with it? My house is overflowing with stuff!

Should I hang on to it? Or try to sell it on etsy? Let me know!

Saturday, May 29, 2010

Getting Caught Up

So, since it is a 3 day weekend and I woke up at my normal, before the crack of dawn time, I thought I would get caught up here. :-)

Like I have said before, I am totally hooked on Zentangles! It is soooooo much fun and such a great relaxation exercise that I create them whenever I can.

Here are a few done a couple weeks ago.

I got into another one of those moods where I wanted to draw something, this time a giraffe...still no clue why these moods hit me LOL
Helen, aka Cathy, (long story....don't ask, just know it started waaaaaayyyyyy back in college LOL) wanted me to draw her an outline of a geisha so she could tangle her clothes. I did that and then since I had the original (I emailed her the outline) I went ahead and tangled her myself.

I used to do a lot of stuff with dominos and rummikub tiles. It dawned on me that I could be tangling on those as well! Here are a couple tiles that I had dyed with left over Easter egg dye a few years ago. Now to decide exactly what I want to do with them!

And finally, I found a plain white tote bag at a yard sale, still in it's original, sealed package from Michael's. It just called to be tangled!!!! So, being the big spender that I am, I handed over the 25 cents and came home and created this. I am still trying to decide what I want on the back.


Friday, May 28, 2010

Hey Look!

I FINALLY updated my blog banner! LOL

Bet you are all so glad that it is no longer the winter scene that you don't even care that it isn't centered! haha

Spent this evening getting caught up on blogs

And look what I found...

http://zentangle.blogspot.com/2010/04/too-cute.html

My little girl is 'famous'! Isn't she a cutie pie?!

Gonna post some tangles this weekend.....hopefully. I have been so busy with work and such that I didn't touch a pen for over a week! (gasp)

I have big plans for this weekend......gardening, tangling and reading!

Friday, May 21, 2010

Hey PaleRider!

Just a note for an old and dear friend!!!!

Long time no see! Been thinking about ya and wondering how you are doing.

Next time you drop in, email us....would love to hear from you!!!!!!!!!

I still have my hotmail account from the dark ages LOL

Sunday, May 09, 2010

Happy Mother's Day!

I hope all you Mom's had a wonderful day. The weather was really nice for the first part of the day...sunny and warm. Then the rains hit and I came inside to play. :-)

I have been in the mood to draw a turtle. Don't ask me why cause I have no clue! LOL

So, I drew a sea turtle (along with some stylized seaweed) and then 'tangled' it.

Here is it before shading. I debated back and forth as to whether I wanted to shade in color or black/gray.
I opted for color and am not sure whether I made the right choice or not. The scanner did not do justice to the colors. Although the colors are light and not very intense, they are darker than the scanner showed...even after playing in photoshop, I couldn't increase the intensity without it becoming too vibrant. And there was some blue streaks in the background that the scanner did not pick up at all!

I will eventually take a photo of it but until then...


Thursday, May 06, 2010

Tangling

I have found, much to my surprise, that creating Zentangles relieves my back pain (my mind is no longer thinking about the pain, thus I relax and it disappears)

I had to create 5 zentangle ATCs for a swap. I ended up with about 30! Here are a few of them. They are standard 2.5x3.5

Then I thought....what about square for a change. These are 4"x4"

And of course, since I cut the above squares from 4x6 cardstock, I had to use up the leftovers so these are 2x2


Tuesday, May 04, 2010

I haven't gotten around to downloading any photos lately although I have tons and TONS of zentangles done! And I did finally take some pics of my glass garden statues actually in the flower beds...but until then, please enjoy the following video of my little girl enjoying her favorite pastime.

Sunday, April 25, 2010

Garden decor and Zentangles

I have been doing an odd mix of things lately. Mostly working LOL But I have squeezed in a few projects as well.

Pam has gotten me into trouble again (she is very good at getting me hooked on new projects!) She sent me some photos of 'totems' and now my yard is full of them.

This is recycling at is best! With the beginning of yard sale season, people are just begging you to take their old glass off their hands....and I am very happy to oblige!

Below you will see my first 2 statues....I have currently finished 5 with supplies for at least another 6 or 7 sitting in the garage.

This first one currently lives in the garage until I find a place for it or someone steps up and says....hey, I want that! :-)

This one is my favorite so far, I love the bluish-green color of the goblet and the small glass on top echos that color in a lighter shade. It goes very well with the color of our house. It is currently residing in my creeping phlox bed. I definitely need to get out there and take a picture.
I am in a Zentangle ATC swap. Being that it is for the badbabyart group. I did not follow the rules....bad babies always break the rules! LOL Pam sent me the idea of using rubber stamps in my tangles and seeing how I have thousands of them, it seemed like a perfect fit. The hard part was finding a way to make the stamp seem like it belonged...not just stuck there for the purpose of using a stamp. I think I succeeded on some and not on others. LOL


Sunday, March 21, 2010

Zentangles

I haven't been on here in quite a while. I have been going through some intense training at work and that pretty much killed my muse!

Some friends got me started back into crochet over my training period and I have done some really cute amigurumi toys but at this time none are from my own patterns so I didn't think it right to publish photos here.

Then just a few days ago, some friends said they wanted to do a Zentangle swap. Having no idea what on earth they were talking about, I googled Zentangle.

I checked out lots of images and got a feel for what it was....basically, artistic doodling. :-)

Most places say to divide your page into a grid and then fill each section with patterns. I didn't read any of the 'rules' because in my opinion art should never be confined by rules.

I created a few by using a basic grid but they were so boring I didn't bother to even scan them.

I began by using a sharpie marker (because that was all I had on hand) but the fumes were making me nauseous. I have since switched to Prismacolor fine line markers. Sizes 01 - 08. But in the mean time I did a couple using a black colored pencil. I couldn't get a crisp line but I loved the shading effects I could achieve.

These first 2 were done with Crayola black colored pencils.

I then made the conscious effort to add a specific image into my doodles. In this case, a flower.
More ideas started coming to me....at odd times. Like at the grocery or while driving down the road. It has been rough trying to remember them for when I get home to play. :-)
This frog came to me as I was heading to bed. Thankfully I remembered and could create it after work the next day.
Minnie inspired this one but I want to redo it and make the face more appealing....when I find the time LOL
My friend recently crocheted the most adorable ladybug and ladybugs have been stuck in my mind ever since. I thought it would look great on a doodled leaf...and I think I was right. :-)
I collect dragonflies so of course I needed a dragonfly 'tangle!
Not sure of this one yet. It came to me while we were driving to Walmart. I wanted to create a chain.

I have found these to be extremely fun and addicting. I can complete one in a relatively short time. They also help clear my head (which is a bit cramped right now with the training I have been going through). And there is no pressure....I mean, how can you mess up a doodle?

Sunday, January 17, 2010

Playing around with the Cricut

Over the past few months I have aquired several new cartridges but haven't had time to play with them. :-(

I pulled out my Pagoda cartridge today! This one has so many awesome Asian images!!!!!

I used the cherry blossom branch (cut twice) to enhance the ATC below. The woman is from Stonehouse Stamps. The kanji says "spring".
This woman comes from Missing Link Stamp Co. I had originally planned on this being an ATC as well but I liked the bridge cut a bit bigger and then I needed a bigger card. It measures 2 3/4 x 5 1/4. The maple branch and bridge are from the Pagoda cartridge.

All the coloring (other than skin tones) are done with Twinkling H2Os. I even highlighted the maples leaves with a coat of these shimmery paints. And my 'river' is just squiggles of paint.
So many other shapes to cut.....so very little time!

Friday, January 01, 2010

Happy New Year!

Let me start with - Way to go Ohio State! They beat Oregon to become the 2010 Rose Bowl Champs!!!!!

My husband is very upset (we live in Oregon LOL)

I spent most of the game playing in my art room with the game playing in the background but I made sure to cheer at the appropriate times. :-)

I woke up with the idea of 'time' and 'clocks' on my mind.

The clock face is stamped on transparency film (because I wanted to see if it would hold up under the solder). Both the clock and the text are from Technique Tuesday.

The gear is from Tim Holtz. I had a heck of a time soldering it onto the frame (and have the burnt finger to prove it!)


Monday, December 28, 2009

Soldering

Many years ago I taught myself how to solder stained glass. I had all the supplies....soldering iron, foil tape, flux, glass cutter... Then I got divorced and for some reason way beyond me, I lost all those items in the settlement. Hmm


Anyway, over the past couple years I have been wanting to get back into it but just never got around to restocking my supplies. A couple months before Christmas, I saw a 'kit' from Simply Swank that had all you need to get started.


On Saturday, I took my birthday money and bought the kit (as well as lots of extras!)


Below is my first creation......I said it had been a very long time ago!!!!! My soldering is a bit rough but I had a blast! The girl is a stamp from Oxford Impressions. She is colored with pencils.


Hubby bought me a new camera for Christmas. Minnie no longer runs everytime I pull it out. Silly girl would fly out of the room everytime I grabbed my camera. I am wondering if the fact that the new one is black and not silver has anything to do with it.


So, this is a charm of Minnie. It is 1" x 3/4". My soldering was MUCH better until I had to adhere the jump ring. Then the top got all messed up....I was having some major issues LOL It took me 4 tries to even get it on there and yes, I know....it is not in the middle. I may eventually remove it and try again. But not today!

Thanks Mom for the birthday money!!!!!!
See, no running! Last week, she would never have stayed still, she would be flying down the hall and my only shot would be of her tail turning the corner into the bedroom. LOL
BTW her tail is NEVER still, the tip swishes ALL the time...thus I caught it in mid air LOL

Saturday, December 26, 2009

Now that the gifts have been opened...

Long time no see...

Now that all the gifts have been given (and opened) I can post photos of my latest projects. I haven't done much lately. Between work and getting ready for Christmas, I didn't get a whole lot of art done!

I was in a stocking swap with Pam. The rules? Alter a Christmas stocking using nothing but supplies from our stash.

I bought a white velour stocking from the dollar store (my only purchase for this project)

I pieced together all kinds of Christmas fabrics (and didn't even come close to using all the patterns I have on hand) I was going for sort of a 'crazy quilt' look.
I then painted a Santa on a page of German text from an old book (I had received these pages years and years ago in a swap). I embellished with lots of buttons and cut out the mini Christmas cards from some card stock bought earlier in the year.
This snowman is made from a gourd that I dried years ago. I still have a box of dried gourds in my shed. I pull them out whenever I need to make a Christmas ornament. This little guy was tucked into Pam's stocking.
Finally, my hubby thinks sock monkeys are very cute and let me know that he never had one as a kid. I found the original socks online along with the original pattern. Hubby got a great kick out of finding this happy fellow tucked under the tree.
I didn't make this but Minnie wanted to share her present too. My little girl is now living 5 feet above the rest of the world LOL She is enjoying her bird's eye view of.......the birds! :-)


Saturday, October 17, 2009

Halloween Postcards

I hosted a Halloween postcard swap this month with the BadBabies. I had a blast creating my cards and from the work I received from all the other players, I think they did too!

So, I am going to walk you through my card.

This is the purchased postcard I began with. It sort of started out a bit creepy. LOL I wanted to turn this run down old house into a honeymoon cottage for my couple. I sanded the entire card to increase that dilapidated look. Notice there is writing that I need to cover up at some point.


I painted a moon with acrylics and stamped the witch. (inkadinkado) The spider on the roof was stamped first in red but he didn't show up as well as I wanted so I overstamped him in black. (BoBunny) Can you see the ghost coming out of the upper right window? He is stamped on peach colored vellum. He is from one of my very first stamp sets. Poor thing is at least 25 years old. (inkadinkado)

Did you see the houseguest peeking out of the front door? I just love him. He is part of a trio of dancers. I masked the door and stamped him in (PSX)

I found my lovers on one of my photo cds. I was originally looking for a bride but when I saw this couple (and she was already tinted orange!), they seemed perfect.

They did need a little cosmetic work though. I used Photoshop Elements 5 for their enhancements. I gave him his lovely snow white complexion. She was much tougher. It seems she has very 'clear' skin LOL Using several layers, I added in her skeletal features....skull, hand and leg bone. Unfortunately, it is easier to see these features on the computer than the printed version but it is obvious that something is amiss. LOL

Mary was here last night helping bind the books and after staring at my card for a few moments finally said....what the heck is wrong with her face, she looks kinda creepy! LOL

And now for the finale. I stamped a wrought iron fence across the bottom (BoBunny) then added the pumpkins on top (Stampin Up and PSX) They are on regular printer paper and colored with pencils.

All the edges were 'distressed' with Tim Holtz Distress Inks (walnut stain and spiced marmalade)
They look happy in their new home, don't they?

Here is the cover of the book. I used a photo of a fence post wrapped in barbed wire that I took last summer (thinking it would make a great background someday).
The web in the lower corner is from a brush set I found online. I listed my favorite brush sites on my last post. :-)
I absolutely hate spiders, they totally creep me out, so I have no idea why on earth I wanted webs and a spider on this book! The spider is one of those cheapy plastic rings you see everywhere (except when you NEED them). I just cut off the 'ring'.

I am mailing out the books on Monday. I sure hope everyone likes them. I know I do!

Tuesday, October 06, 2009

Apron is done and delivered!

I finished Pam's apron and she received it on Monday so I can share the final product.

Pam is a bookmaker! She makes tons of them!!!! I am in awe of her! :-)

So, I made her a bookmaking apron.

I went with a play on words...

Below is "Japanese Stab". Pretty easy if you know book making basics...or even less if you are like me LOL


And this next one was tougher. Pam says she woke up in the middle of the night with the answer LOL Do you know your bookmaking techniques? Can you guess what it is?
How about "Coptic"? Yeah, it is a stretch LOL
And finally the finished apron. I haven't painted on fabric for years so it was really fun to pull out all the old brushes again. :-)


Friday, September 25, 2009

Playing with Digital

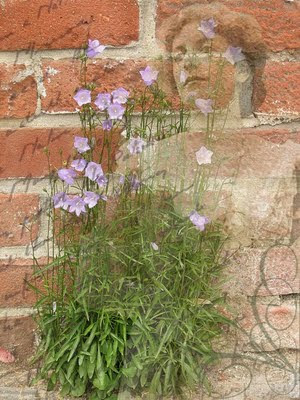
I started with a photo hubby took years ago in Dunsmuir. The flowers against the brick wall.

I added the woman from one of my photo cds.

The text and swirls are both brushes I downloaded online. No longer sure where they came from but my favorite places are

deviantart.com
getbrushes.com
damnedinblack.net

search for photoshop brushes and you will find dozens of sites!

And finally, I used a "scratches" overlay to give an even roughness to the finished project. Again, a free download. I am horrible. I download free sets of overlays and such, keep the one or two that I want and discard the rest. I lose track of where they came from. Here are a couple places I have frequented in the past.

digitalscrapbookplace.com
digiscrapdepot.com

I had fun playing around with layers, opacity and brushes. It was a fun way to relax and lose an hour or two. :-)


Tuesday, September 15, 2009

A is for Angels

I was reading the latest Somerset Holidays and Celebrations and saw this wonderful idea - the ABC's of Christmas. The example in the magazine was done 3x5 and stored in a box almost like a recipe box. I decided I liked the concept of a book instead with the tabs at the bottom like little footnotes.

I am using 4x6 manilla index dividers and like I said, putting the tabs on the bottom. I will eventually bind all the pages (plus covers) using my Bind-It-All.

So, I have 2 done. Not too bad since I just started yesterday.

A is for Angels

The angel girl came from the Vintage Postcards CD from American Image Gallery. The pair of angels are from the Victorian Images Volume Two, SummertownSun. And the "A" came from Memories of a Lifetime - Alphabets and Ornaments book and CD. Whew! that is a lot of image CDs!

I created the Peace on Earth banner using Photoshop Elements 5 and shaded by hand with pencils.

The swirly stamp in the upper left corner is from BoBunny.

I played with the girl a bit in Photoshop Elements and cut out her background. I hand tinted her wings with Twinkling H2os.

Everything is glued down on the divider that I had 'antiqued' with Distress Inks.


B is for Bells:

Not as much 'stuff' here. The B is again from the Alphabets and Ornaments CD. The bells from the Victorian Images. The bells are actually 3D. I printed the middle and right bells again on cardstock and cut them out, rounded them slightly and adhered them with 2 layers of foam tape. They are higher than the gold button clappers.

I used my crop-a-dile to add the eyelet and real bell to the bottom corner.

I am planning on adding lines from corresponding Christmas carols to the back of each page.

Wednesday, September 09, 2009

I'm all over the place!

I started painting Pam's apron. I have the top done. Next will come the pockets and finally the bottom. I am using a bookmaking theme since I know she makes tons of them and enjoys the processes.

Meanwhile, in my spare time, I am working on a bowl made from an old vinyl record. I melted it a couple months ago (when it was 110 outside!) I first put it in my husband's car sitting out in the driveway...just to see how bad it would melt....yeah, I was bored. I sat it on a large bowl and it sunk right down in! It wasn't even enough though so I fired up the grill and melted it some more. You have never had fun until you are standing in 100+ temps cooking a record on a grill! LOL

I am now in the decorating process. I am covering it with torn book pages.


Below is the bowl completely covered before I trimmed the edges. Next, I will be antiquing it....haven't done that yet. :-)
Today, the bad baby group decided to create a fatbook for one of our members that is battling a serious illness. She likes French images and postage (as well as lots of other things). I dug out my Oxford Impression Paris set for the woman and Eiffel Tower. The postmarks are from Hero Arts 'Tour De Luxe" set. I thought....what is more "French" then the Moulin Rouge? I hope it lifts her spirits and brings her healing along faster!